Overview
Wireless Network-Ready Intelligent Traffic Management is designed to detect and track vehicles and pedestrians and provides the intelligence required to estimate a safety metric for an intersection. In addition, the Intel® Smart Edge Open toolkit included in the reference implementation could be used to host a 5G radio access network (RAN) on the same edge device when implemented on a platform supporting a 5G RAN.
Vehicles, motorcyclists, bicyclists and pedestrians are detected and located in video frames via object detection deep learning modules. Object tracking recognizes the same object detected across successive frames, giving the ability to estimate trajectories and speeds of the objects. The reference implementation automatically detects collisions and near-miss collisions. A real-time dashboard visualizes the intelligence extracted from the traffic intersection along with annotated video stream(s).
This collected intelligence can be used to adjust traffic light cycling to optimize the traffic flow of the intersection in near real time, or to evaluate and enhance the safety of the intersection. For example, emergency services notifications, i.e, 911 calls, could be triggered by collision detection, reducing emergency response times. Intersections with higher numbers of collisions and near-miss collision detections could be flagged for authority's attention as high-risk intersections.
The data from the traffic cameras in the intersection can be routed easily using the SmartEdge-Open high-speed data plane for near-real time video analytics in the field. Further, SmartEdge-Open helps to build and manage the infrastructure to deploy, monitor, and orchestrate virtualized applications across multiple edge devices.
To run the reference implementation, you will need to first download and install the Intel® Smart Edge Open Developer Experience Kit.
Once you have installed the Intel® Smart Edge Open Developer Experience Kit, select Configure & Download to download the reference implementation and the software listed below.
NOTE: This software package will not work on the People's Republic of China (PRC) network.
For the open source application, visit the GitHub WNR-ITM repository for the source code.
-
Time to Complete: Approximately 10-15 minutes
-
Programming Language: Python*
-
Available Software:
- Intel® Distribution of OpenVINO™ toolkit 2021 Release
- Intel® Smart Edge Open 22.03.03 with multi-node support
Target System Requirements
Control Plane
-
One of the following processors:
-
Intel® Xeon® Scalable processor.
-
Intel® Xeon® processor D.
-
-
At least 32 GB RAM.
-
At least 256 GB hard drive.
-
An Internet connection.
-
Ubuntu* 20.04 LTS Server.
Edge Nodes
-
One of the following processors:
-
Intel® Xeon® Scalable processor.
-
Intel® Xeon® processor D.
-
-
At least 64 GB RAM.
-
At least 256 GB hard drive.
-
An Internet connection.
-
Ubuntu* 20.04 LTS Server.
-
IP camera or pre-recorded video(s).
How It Works
The application uses the inference engine and the Intel® Deep Learning Streamer (Intel® DL Streamer). The solution is designed to detect and track vehicles and pedestrians by using Intel® Smart Edge Open (version 22.03) with multi-node support.
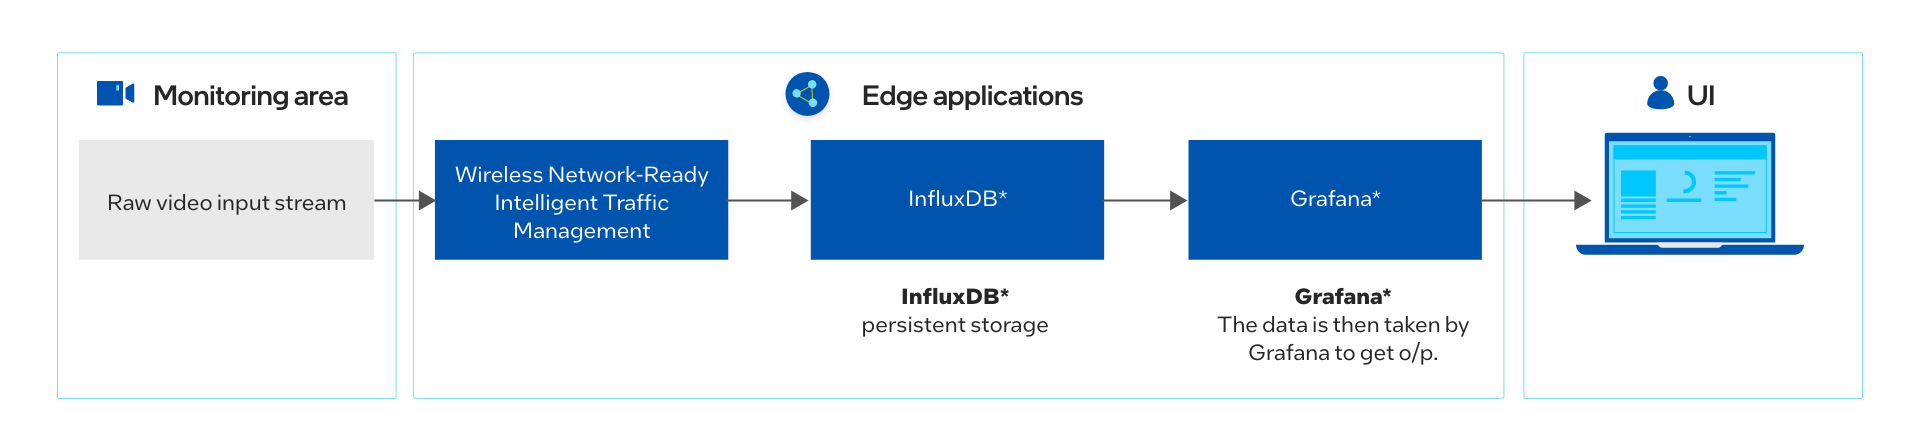
Figure 1: How It Works
The Wireless Network-Ready application requires the application pods, database and a visualizer. Once the installation is successful, the application is ready to be deployed using Helm*. After the deployment, the application pod takes in the virtual/real RTSP stream addresses and performs inference and sends metadata for each stream to the InfluxDB* database. The visualizer in parallel shows the analysis over the metadata like pedestrians detected, observed collisions and processed video feed.
The application has capability to perform inferences over as much as 20 channels. In addition, the visualizer is capable to show each feed separately as well as all the feeds at the same time using Grafana*. The user can visualize the output remotely over a browser, provided that they are in same network.
New in this release are Rule Engine and Cloud Connector pods.
-
Rule engine analyzes each video frame and its inference results. If it matches the configured rules (collision, near miss, overcrowd), it sends the video frame to Cloud Connector to be uploaded to the cloud storage.
-
Cloud Connector uses Amazon Web Services* Cloud Storage to save the video captures.
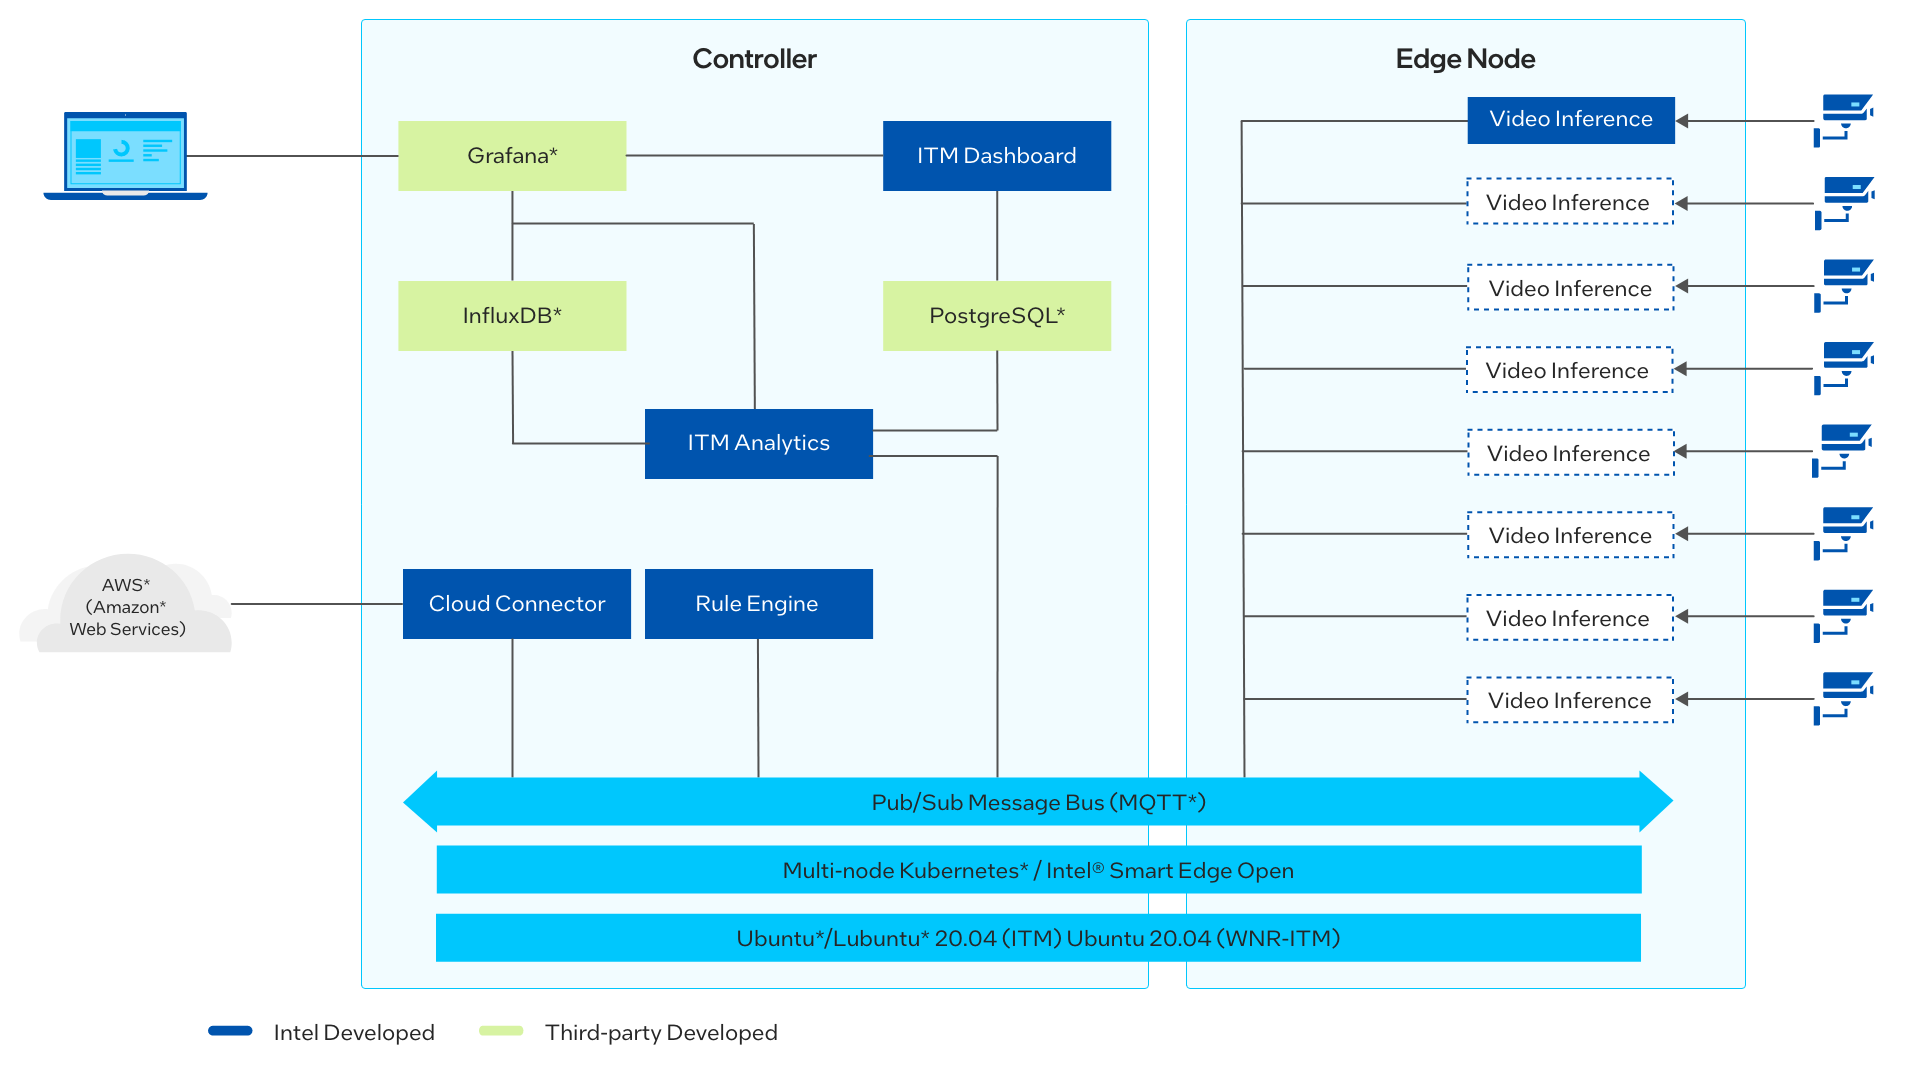
Figure 2: Architecture Diagram
Get Started
Prerequisites
To run the reference implementation, you will need to first download and install the Intel® Smart Edge Open Developer Experience Kit with multi-node support.
Ensure that the following conditions are met properly to ensure a smooth installation process for a reference implementation done through Edge Software Provisioner (ESP) Intel® Smart Edge Open Developer Experience Kit package.
Continue using the same smartedge-open user throughout this tutorial.
Hardware Requirements
Make sure you have a fresh Ubuntu* 20.04 LTS Server installation with the Hardware specified in the Target System Requirements section.
Step 1: Install the Reference Implementation
NOTE: The following sections may use
<Controller_IP>in a URL or command. Make note of your Edge Controller’s IP address and substitute it in these instructions.
Select Configure & Download to download the reference implementation and then follow the steps below to install it.
-
Make sure that the Target System Requirements are met properly before proceeding further.
-
If you are behind a proxy network, please ensure that proxy addresses are configured in the system.
export http_proxy=proxy-address:proxy-port export https_proxy=proxy-address:proxy-port -
Open a new terminal as a smartedge-open user and move the downloaded .zip package to the /home/smartedge-open folder.
mv path-of-downloaded-directory/wireless_network_ready_intelligent_traffic_management.zip /home/smartedge-open -
Go to the /home/smartedge-open directory using the following command and unzip the RI.
cd /home/smartedge-open unzip wireless_network_ready_intelligent_traffic_management.zip -
Go to the
wireless_network_ready_intelligent_traffic_management/directory.cd wireless_network_ready_intelligent_traffic_management -
Change permissions of the executable edgesoftware file to enable execution.
chmod 755 edgesoftware -
Run the command below to install the Reference Implementation:
./edgesoftware install -
During the installation, you will be prompted for the AWS Key ID, AWS Secret, AWS Bucket and Product Key. The Product Key is contained in the email you received from Intel confirming your download. AWS credentials are optional.
AWS Key ID, AWS Secret and AWS Bucket are obtained after following the steps in the Amazon Web Services* Cloud Storage Setup section. If you do not need the cloud upload feature, simply provide empty values by pressing Enter when prompted for the AWS credentials.
NOTE: Installation logs are available at path:
/var/log/esb-cli/Wireless_NetworkReady_Intelligent_Traffic_Management_<version>/<Component_Name>/install.log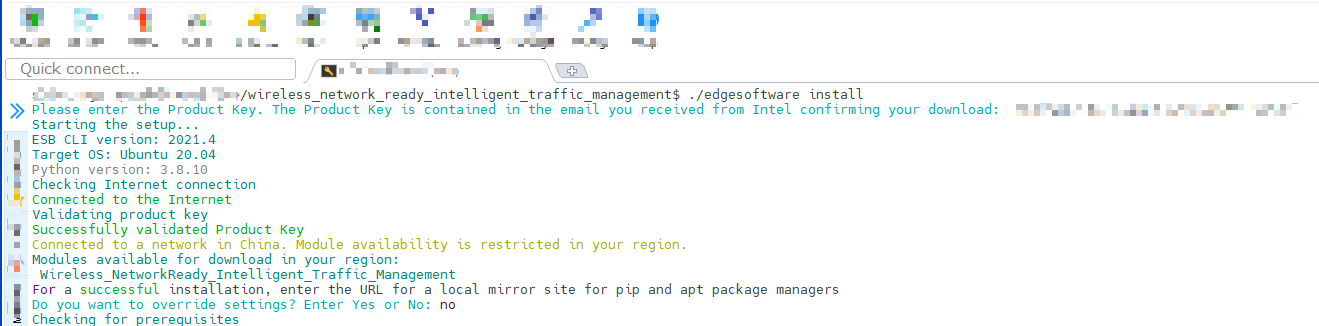
Figure 3: Product Key
-
When the installation is complete, you see the message
Installation of package completeand the installation status for each module.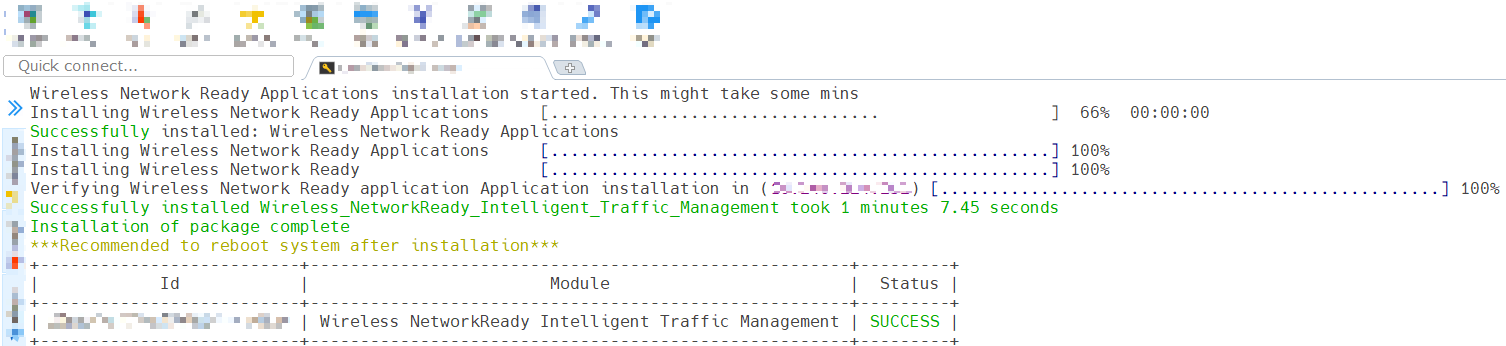
Figure 4: Successful installation
-
If Intel® Smart Edge Open was installed successfully, running the following command should show output similar to the image below. All the pods should have a status of either Running or Completed.
kubectl get pods -A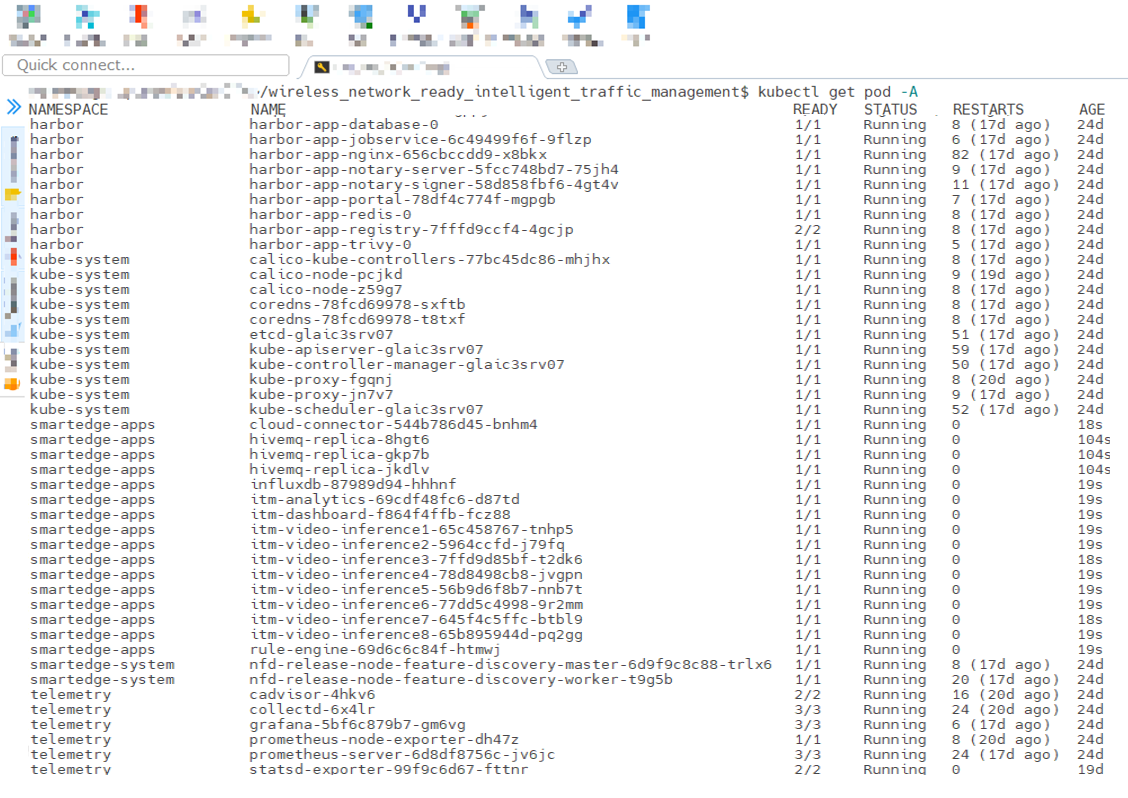
Figure 5: Status of pods
Step 2: Check the Application
Check the Wireless_NetworkReady_Intelligent_Traffic_Management pod with the command:
kubectl get pod -n smartedge-apps
You will see output similar to:
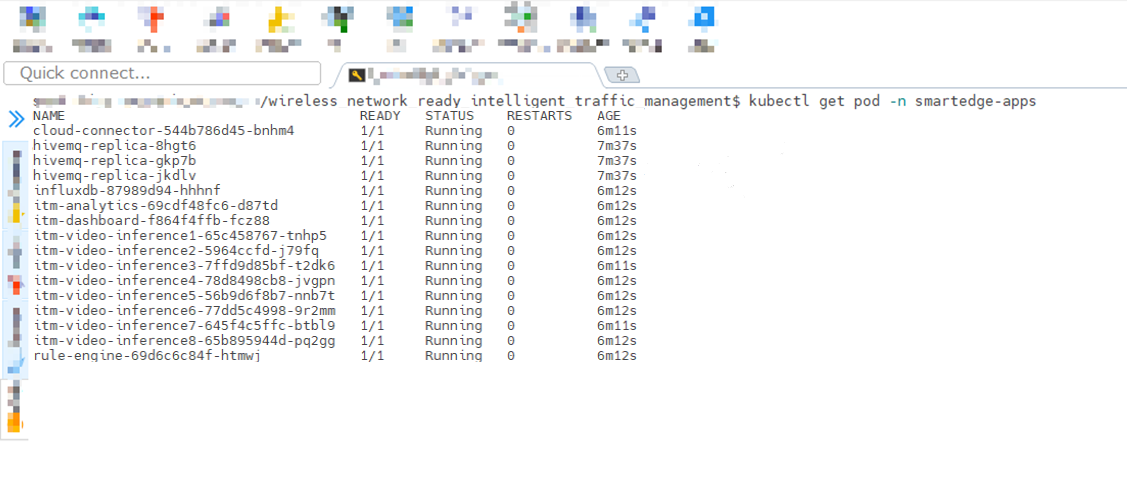
Figure 6: Status of Wireless Network-Ready ITM pods
NOTE: If the pods have a status of
ContainerCreating, please wait for some time, since Kubernetes will pull the images from the registry and then deploy them. This happens only the first time the containers are deployed, and the wait time will depend upon the network bandwidth available.
Step 3: Data Visualization on Grafana
-
Navigate to https://Controller_IP:30300/dashboard on your browser to check Wireless Network-Ready ITM dashboard.

Figure 7: Login Wireless Network-Ready ITM dashboard
-
Navigate to https://Controller_IP:30303/camera/0 on your browser to check Wireless Network-Ready ITM Camera.
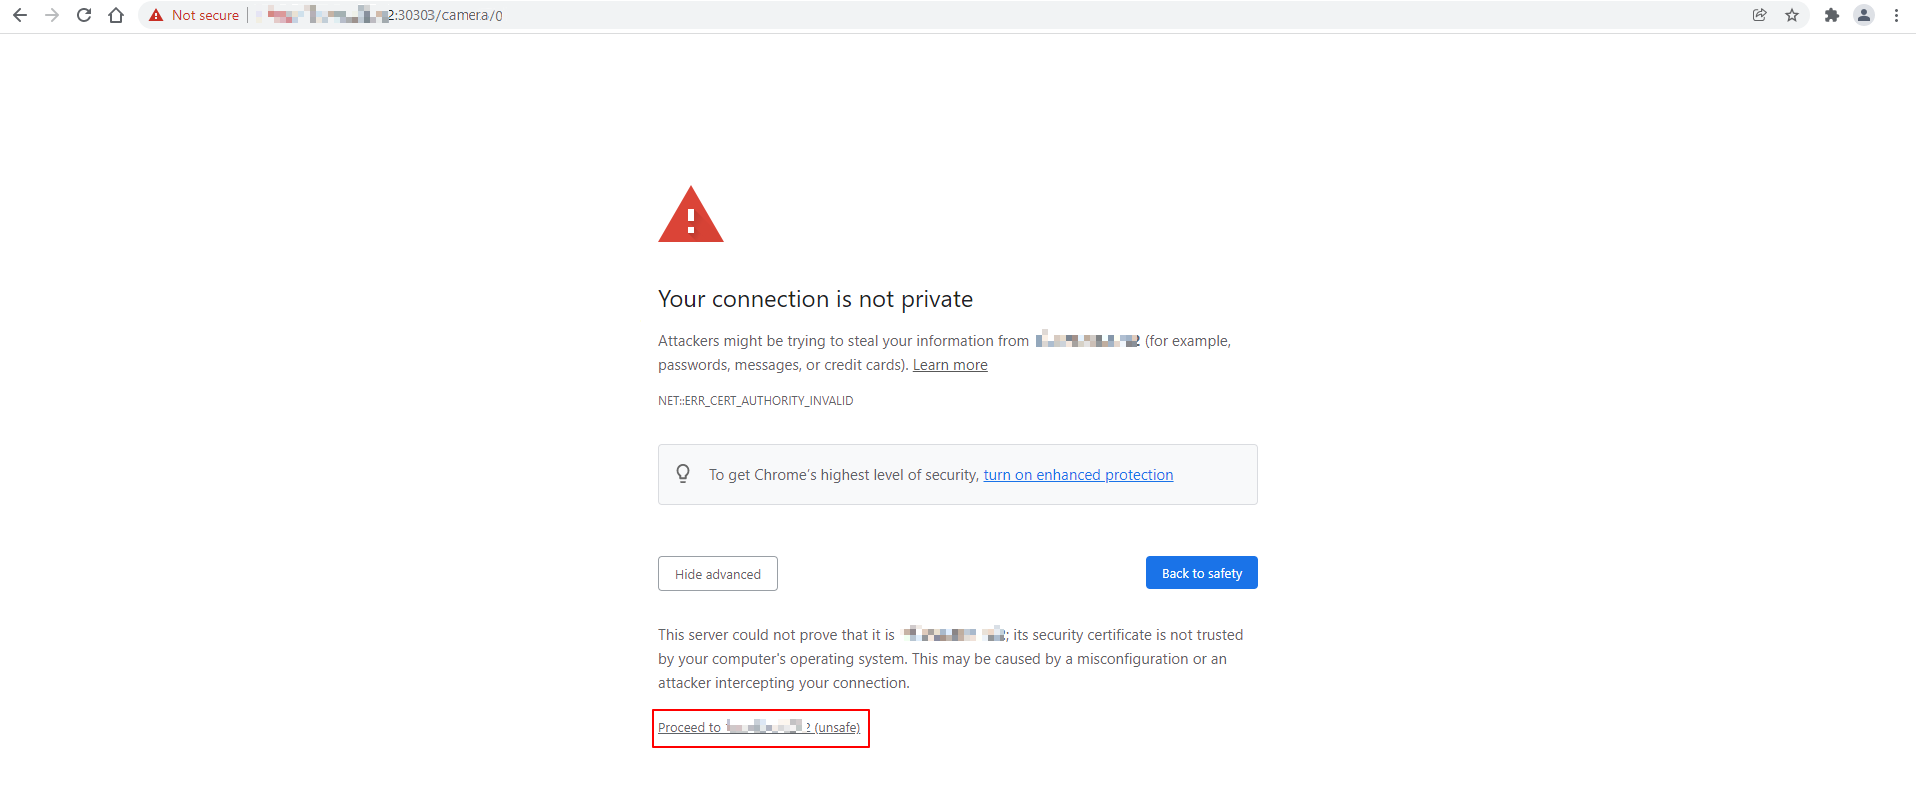
Figure 8: Wireless Network-Ready ITM Camera 0
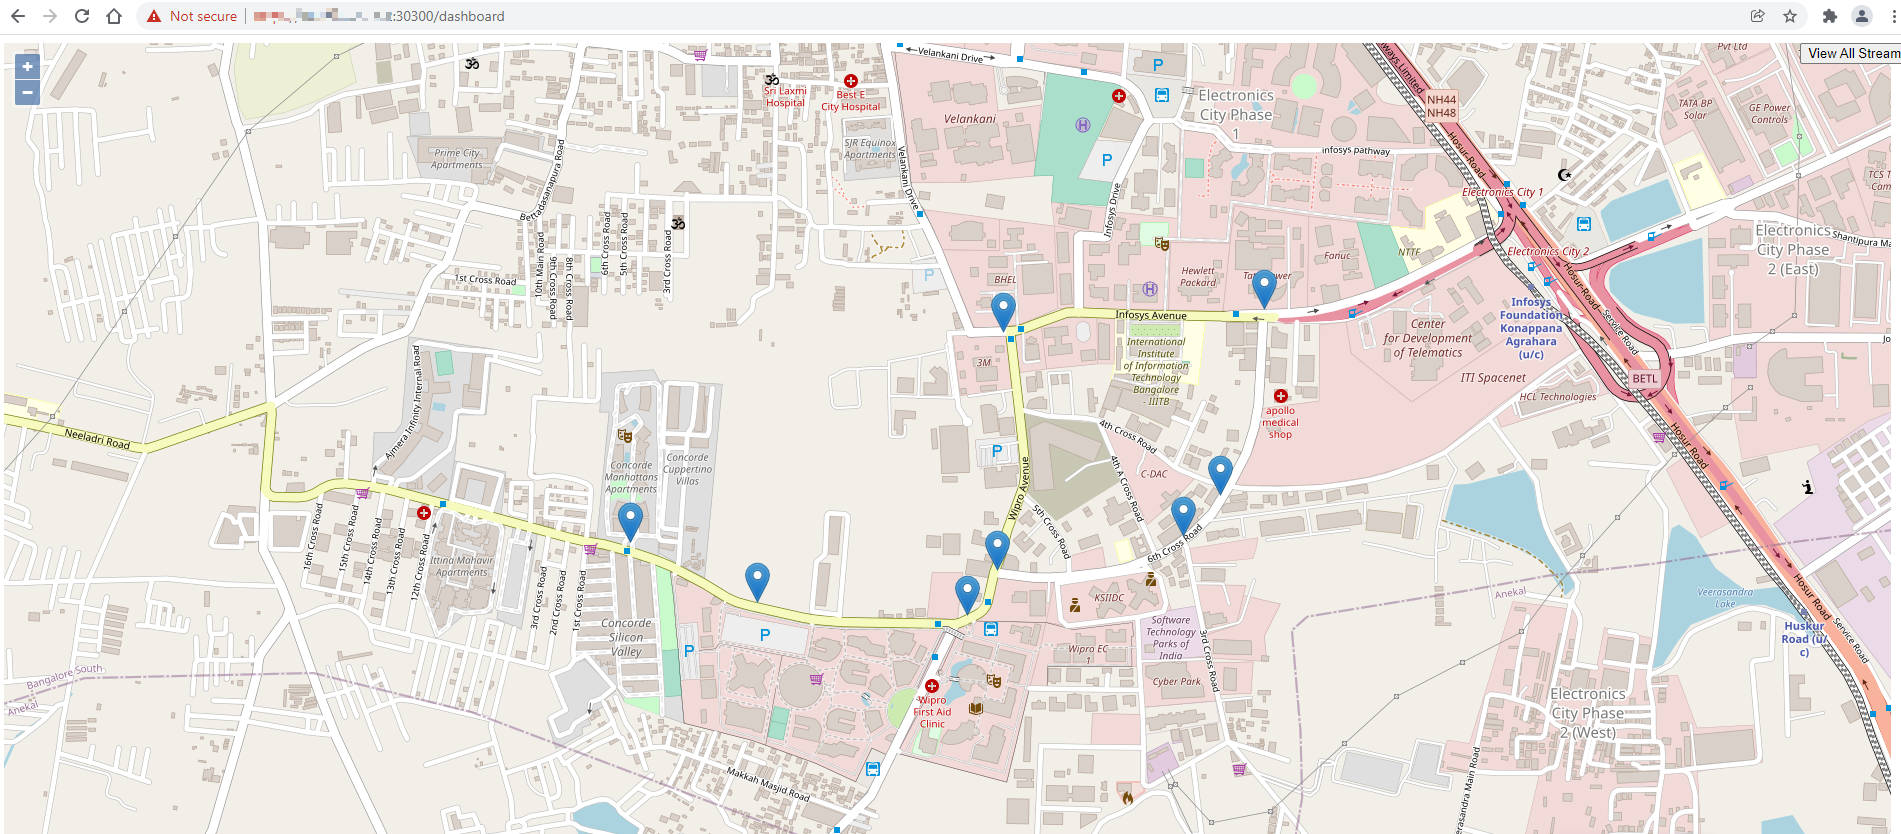
Figure 9: Wireless Network-Ready ITM dashboard
-
Navigate to
<Controller_IP>:32000on your browser to login to the Grafana dashboard. -
Get the Grafana Password by entering the command:
kubectl get secrets/grafana -n telemetry -o json | jq -r '.data."admin-password"' | base64 -d -
Login with user as admin and password as Grafana Password
-
Click Home and select the ITM to open the main dashboard.
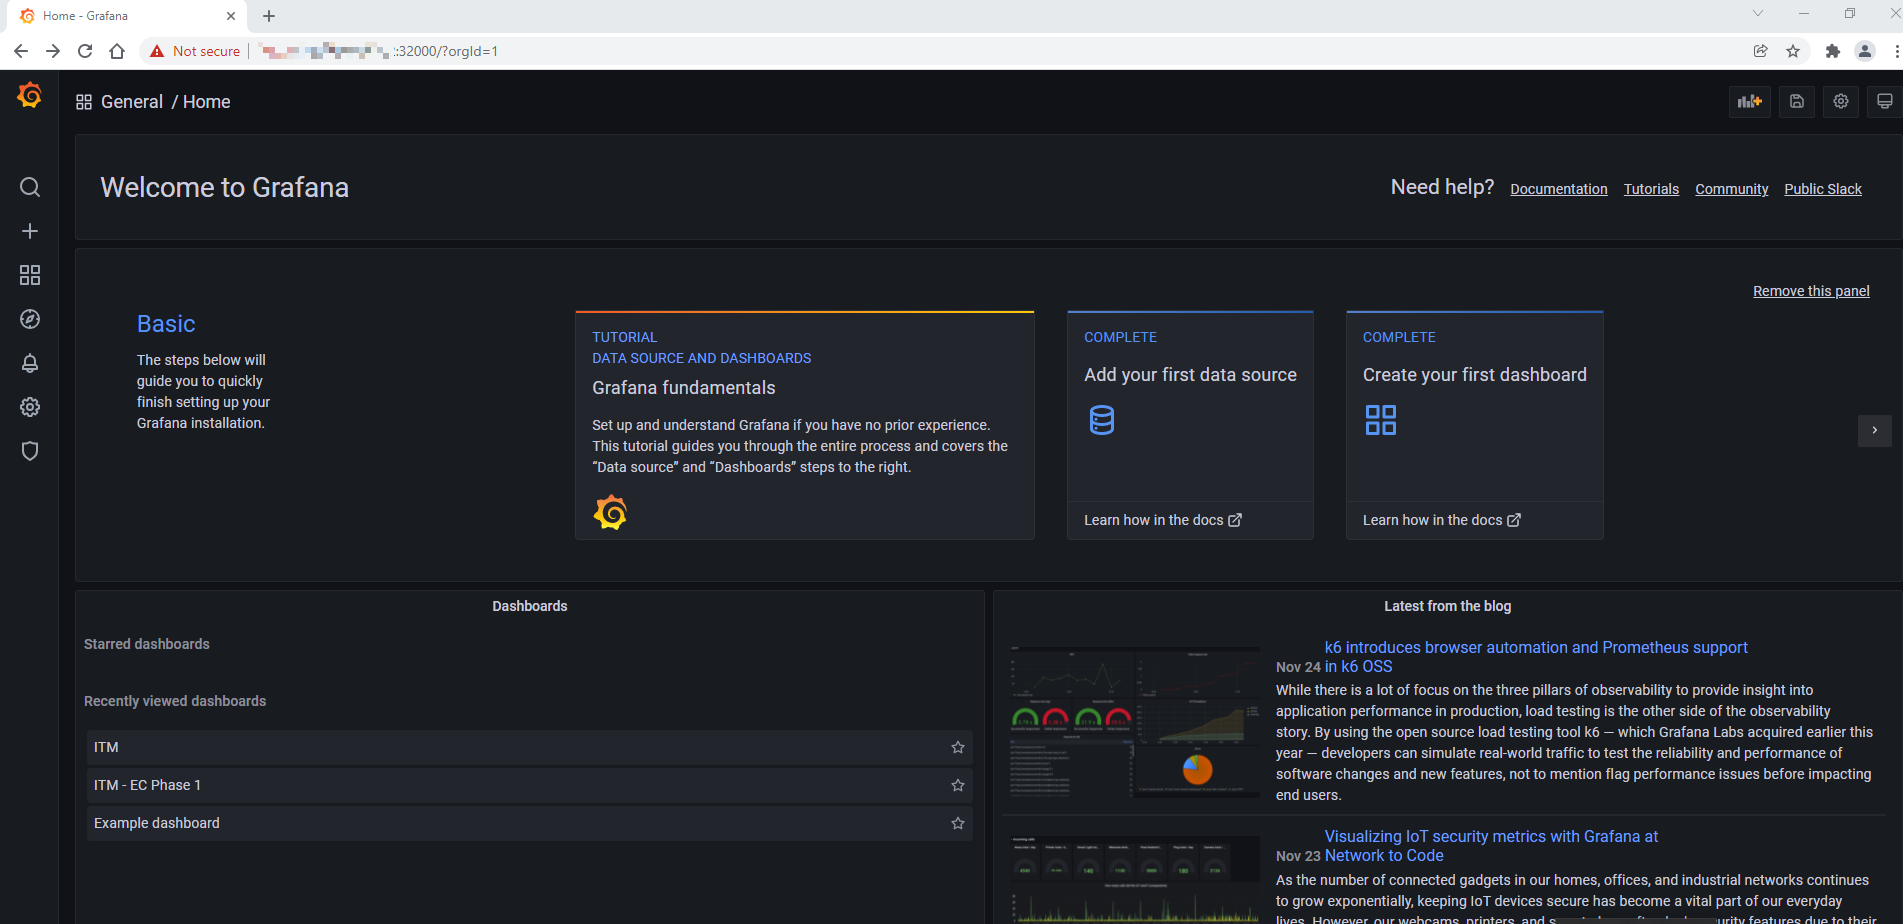
Figure 10: Grafana Home Screen
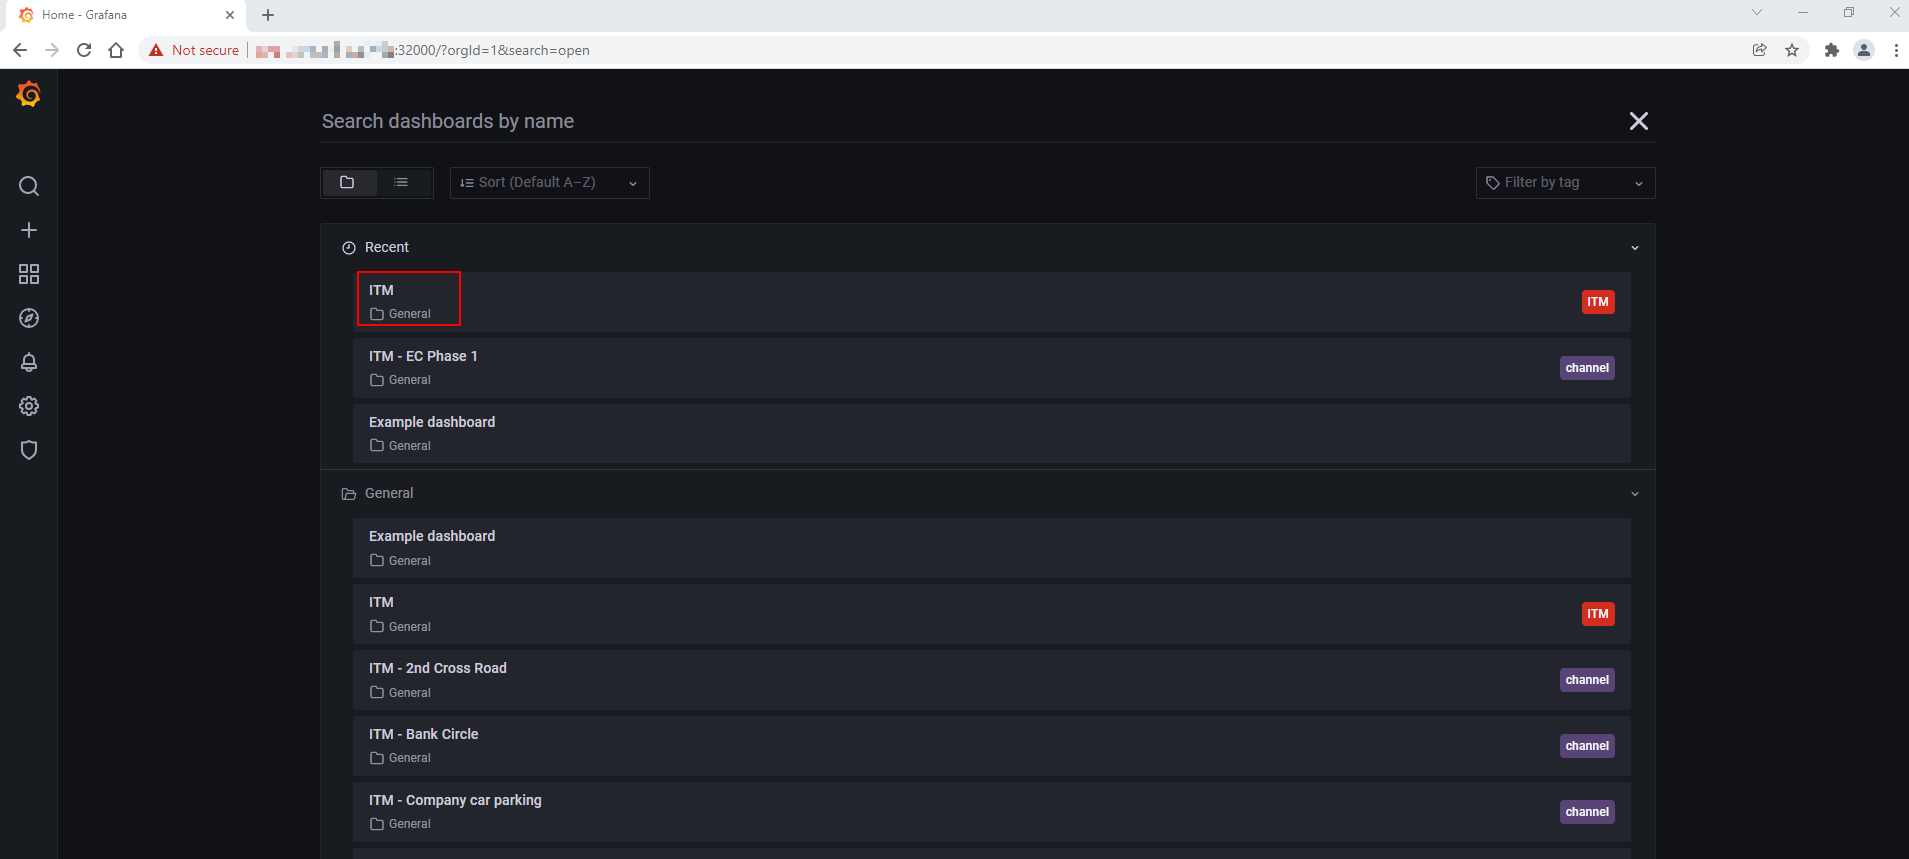
Figure 11: Grafana Dashboard list
An example of the Wireless Network-Ready ITM dashboard:
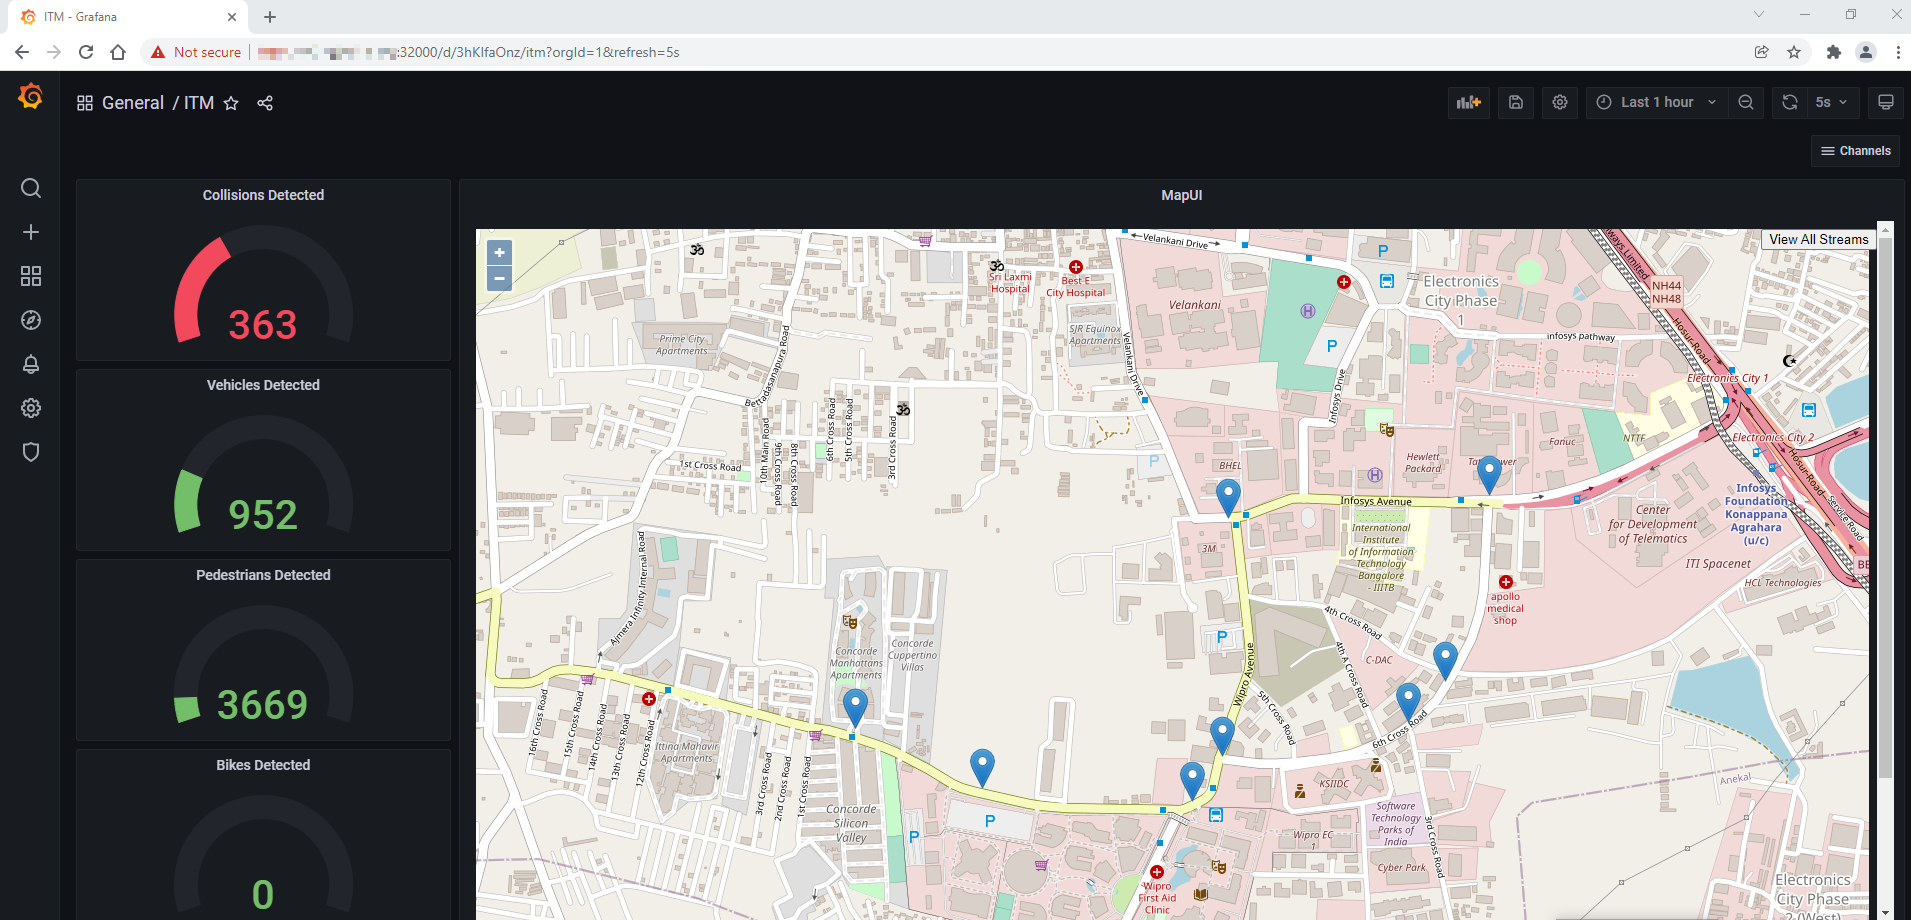
Figure 12: Grafana Main Dashboard – Wireless Network-Ready ITM
The above dashboard shows the number of vehicles, pedestrians and collisions detected on the left side. These may be used for adjusting traffic lights and calling emergency services if collisions are detected.
The blue drop pins on the Map are the geographic coordinates of camera. By clicking on these pins, a small window of the camera feed can be visible with the detection results, as shown in the figure below.
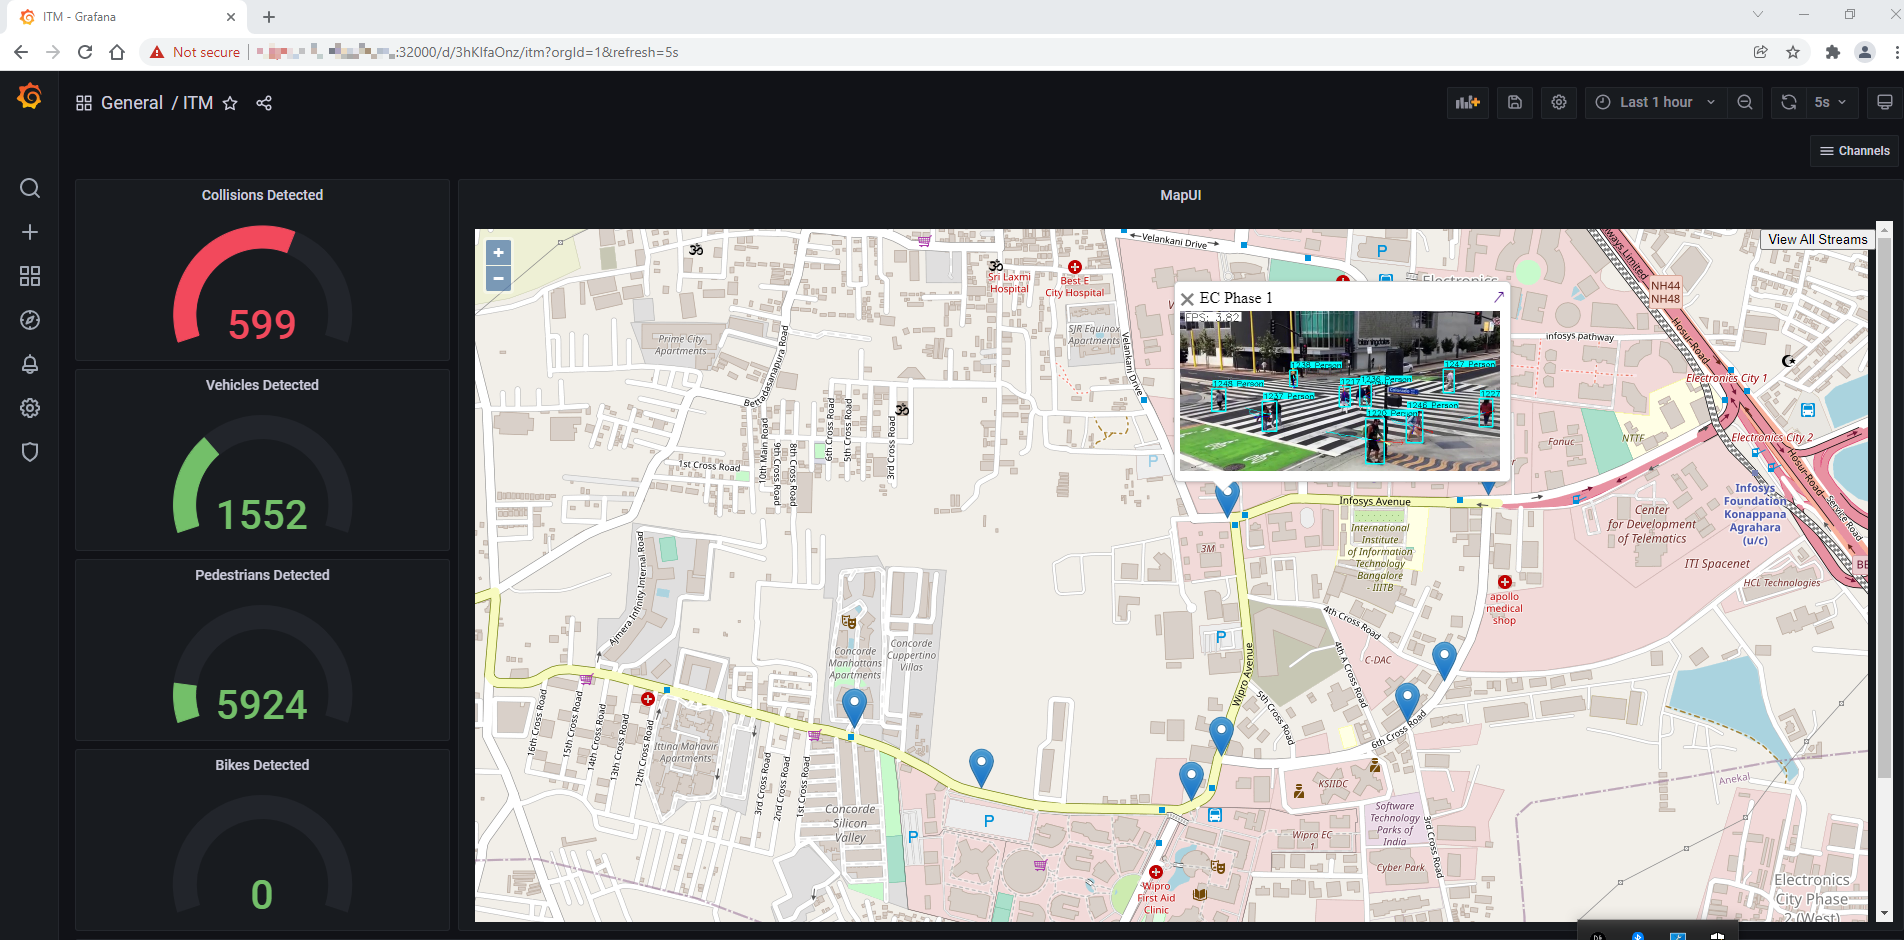
Figure 13: Detection results on MapUI
To open the Grafana Dashboard for a particular camera with the detection results and other data metrics, click on the camera feed on the small window, as shown in the figure below.
NOTE: To close the small window with camera feed, click the close button (X) on the top left corner of the window.
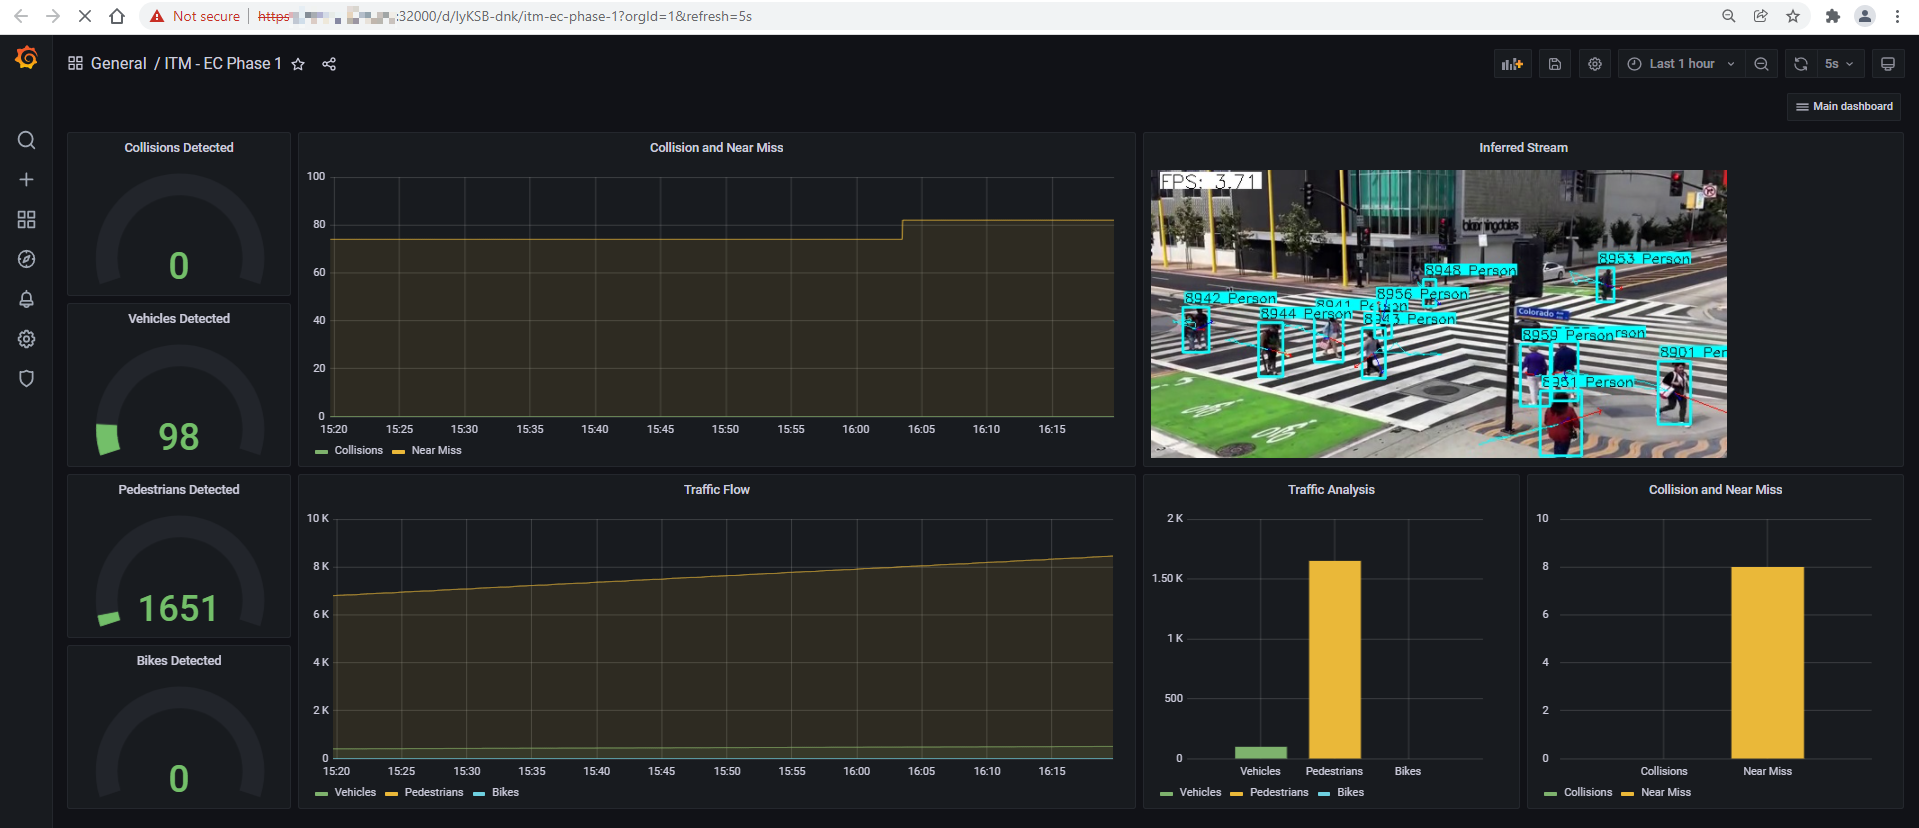
Figure 14: Grafana Dashboard of an individual camera feed
To view the detection results of all the configured camera feeds, click on View All Streams from the top right corner on the MapUI from the main Grafana Dashboard i.e. ITM. Refer to Figure 12: Grafana Main Dashboard – Wireless Network-Ready ITM.
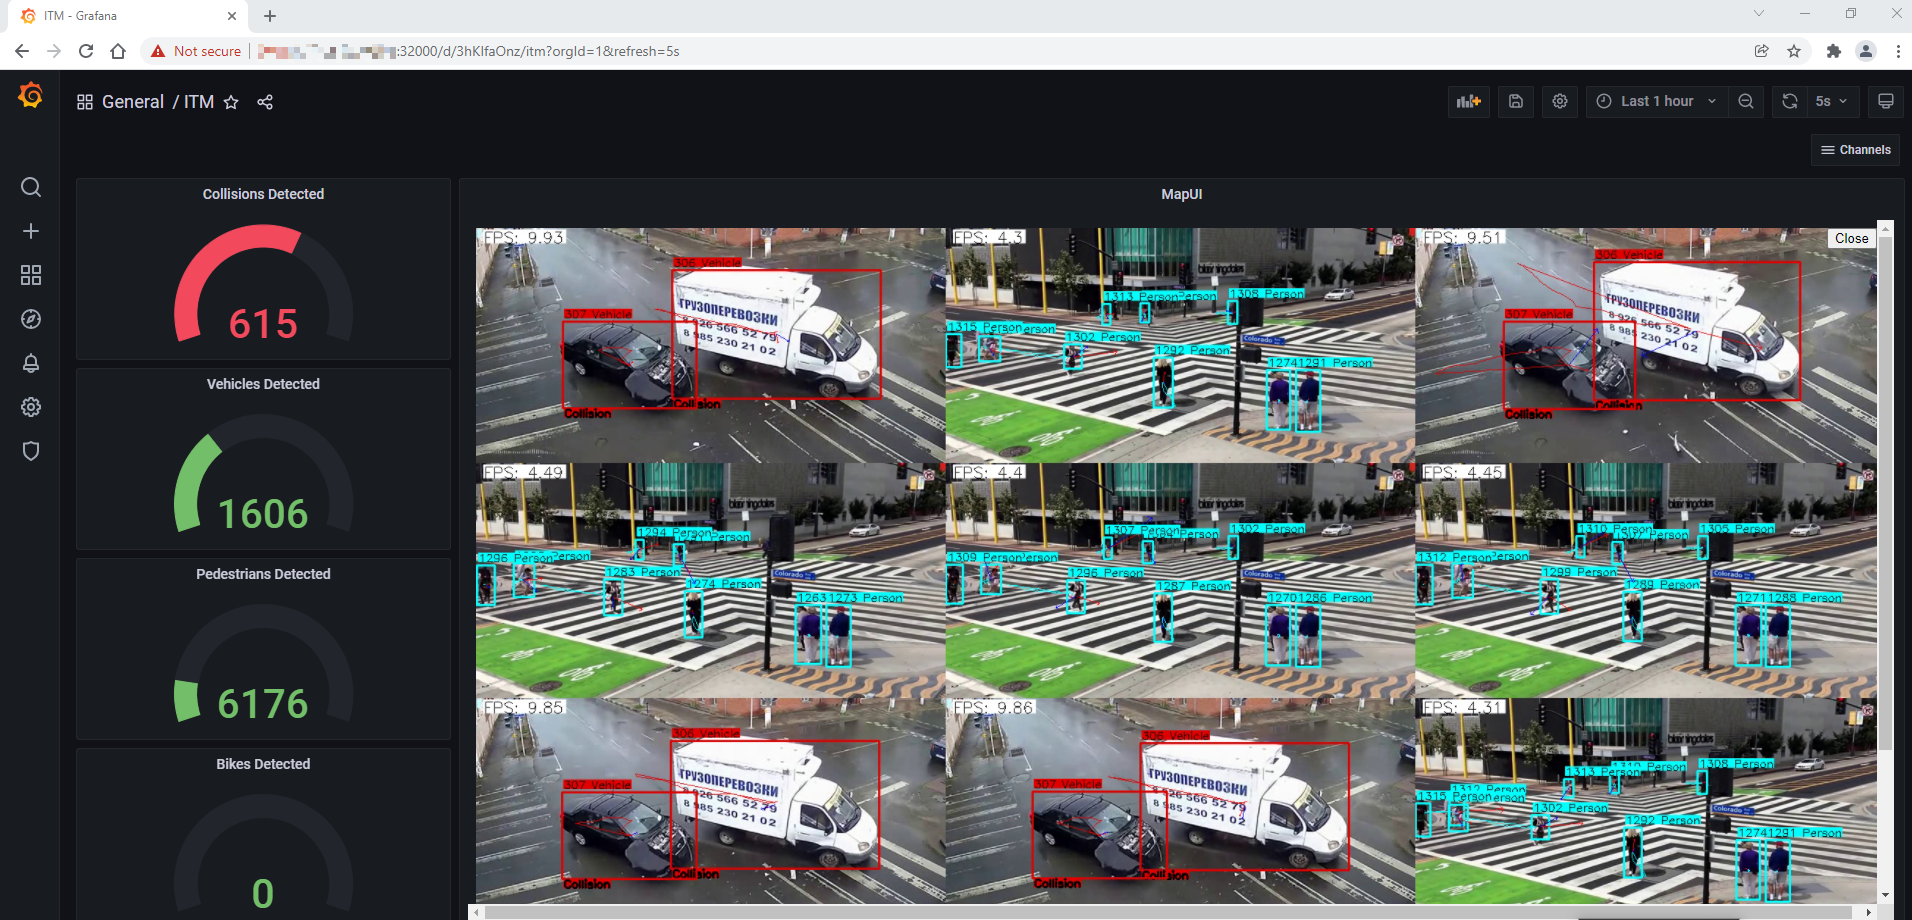
Figure 15: Detection results of all the configured camera feeds
NOTE: To open combined streams in full tab, go to: https://<Controller_IP>:30303/get_all_streams
If the AWS credentials were provided during the installation steps, then you enabled the Cloud Upload feature.
Navigate to the configured AWS storage to find the uploaded video captures.
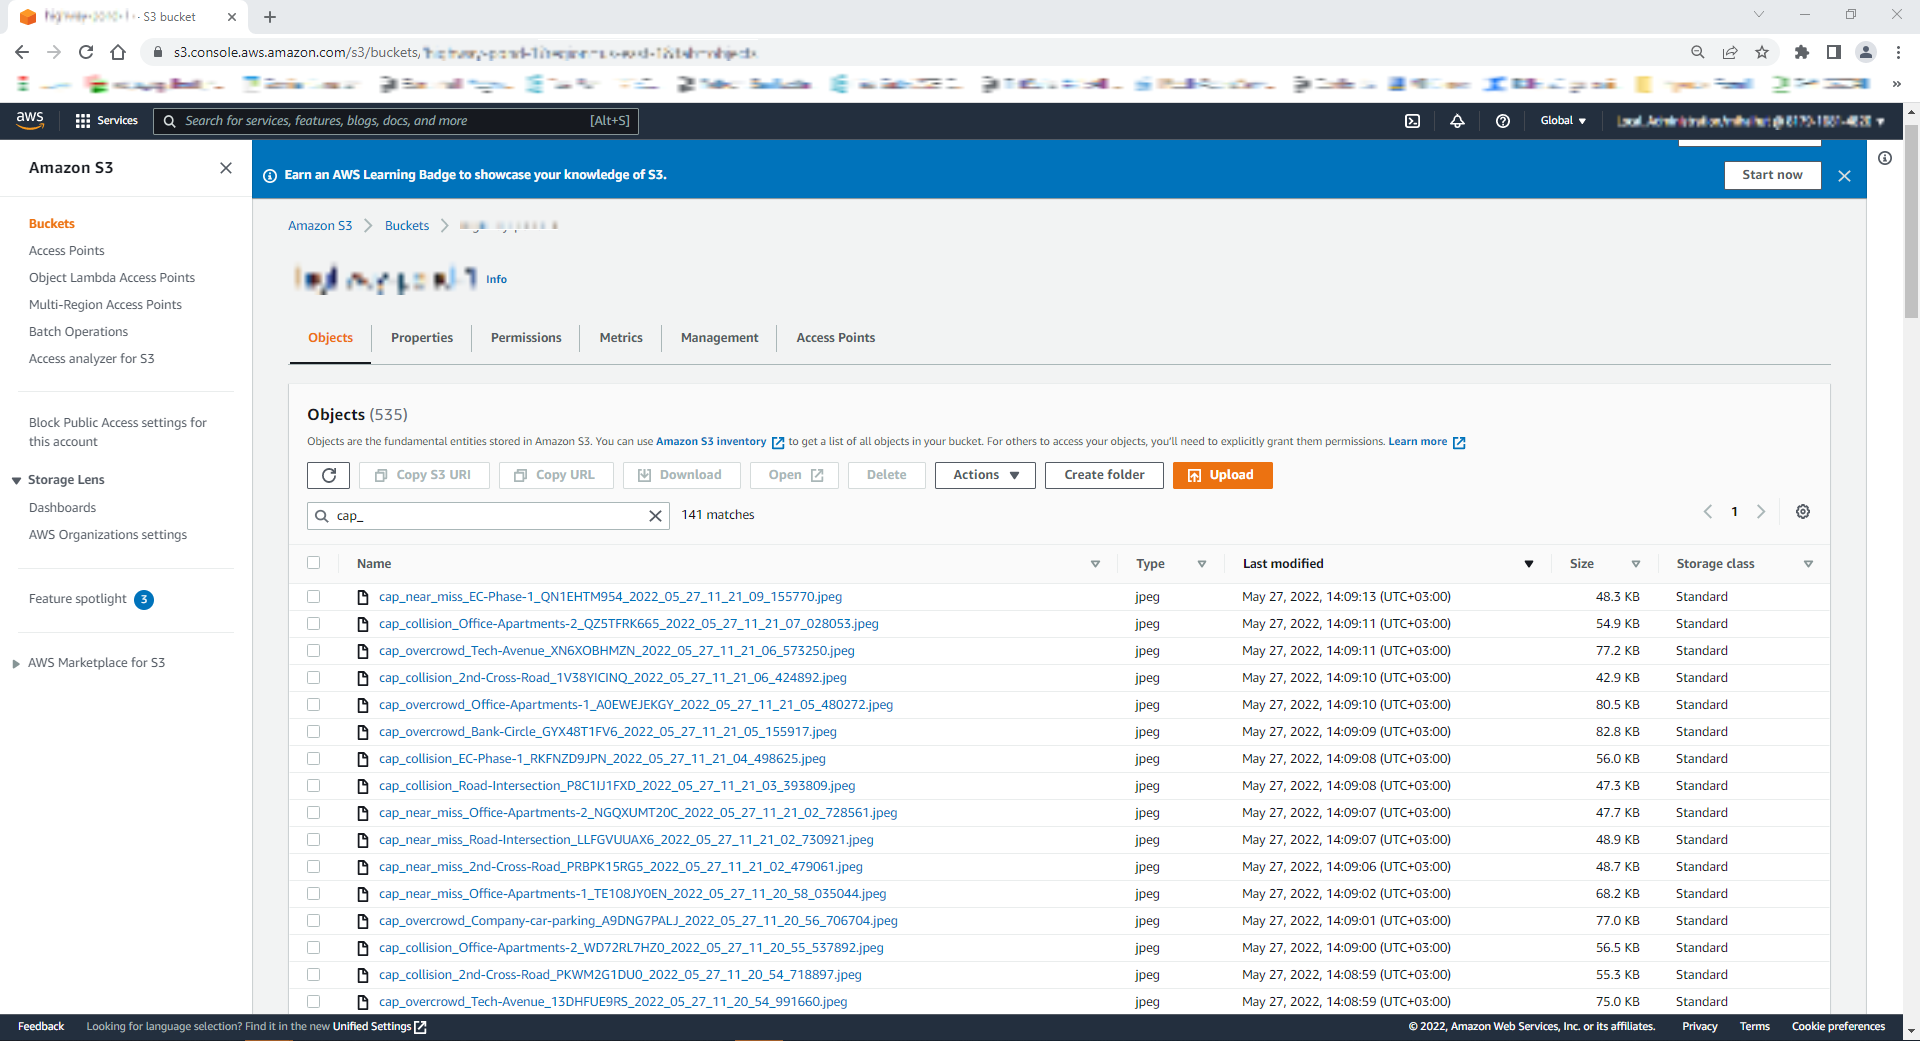
Figure 16: List of AWS S3 Bucket Objects
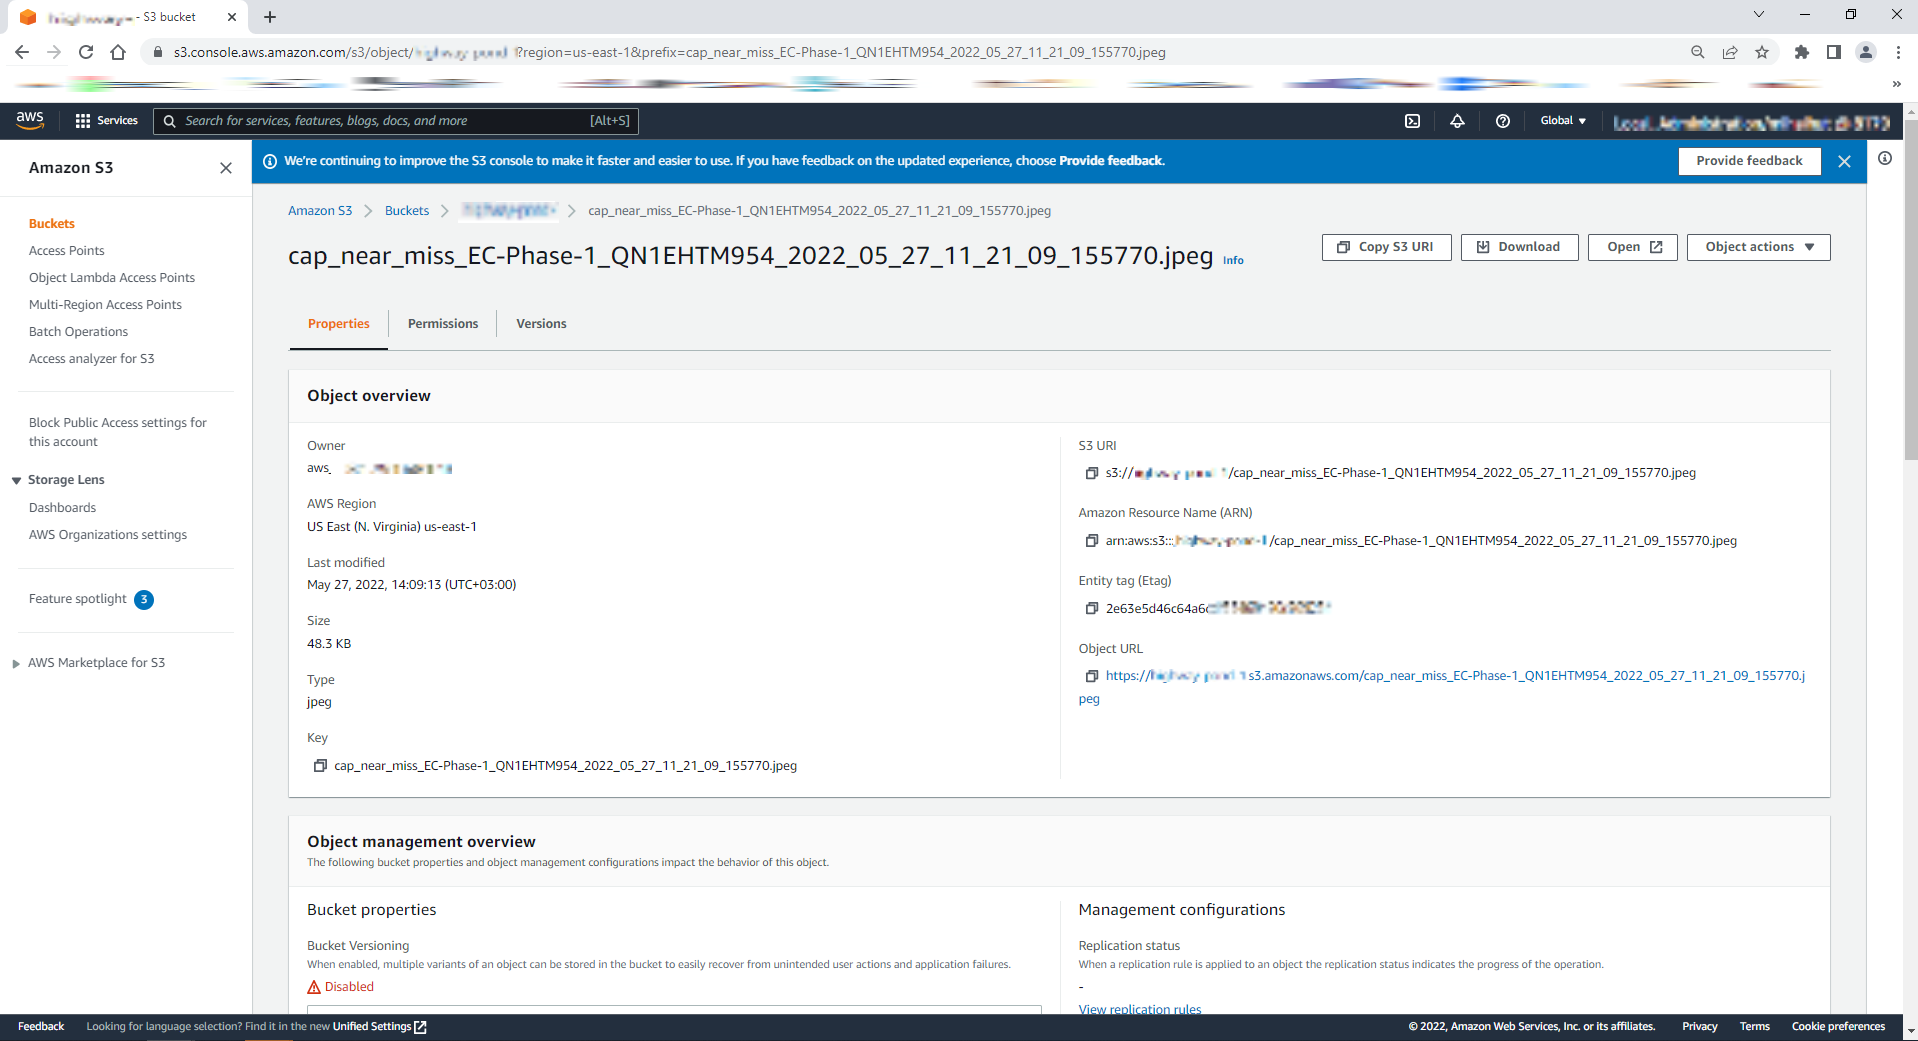
Figure 17: AWS S3 Bucket Object Properties
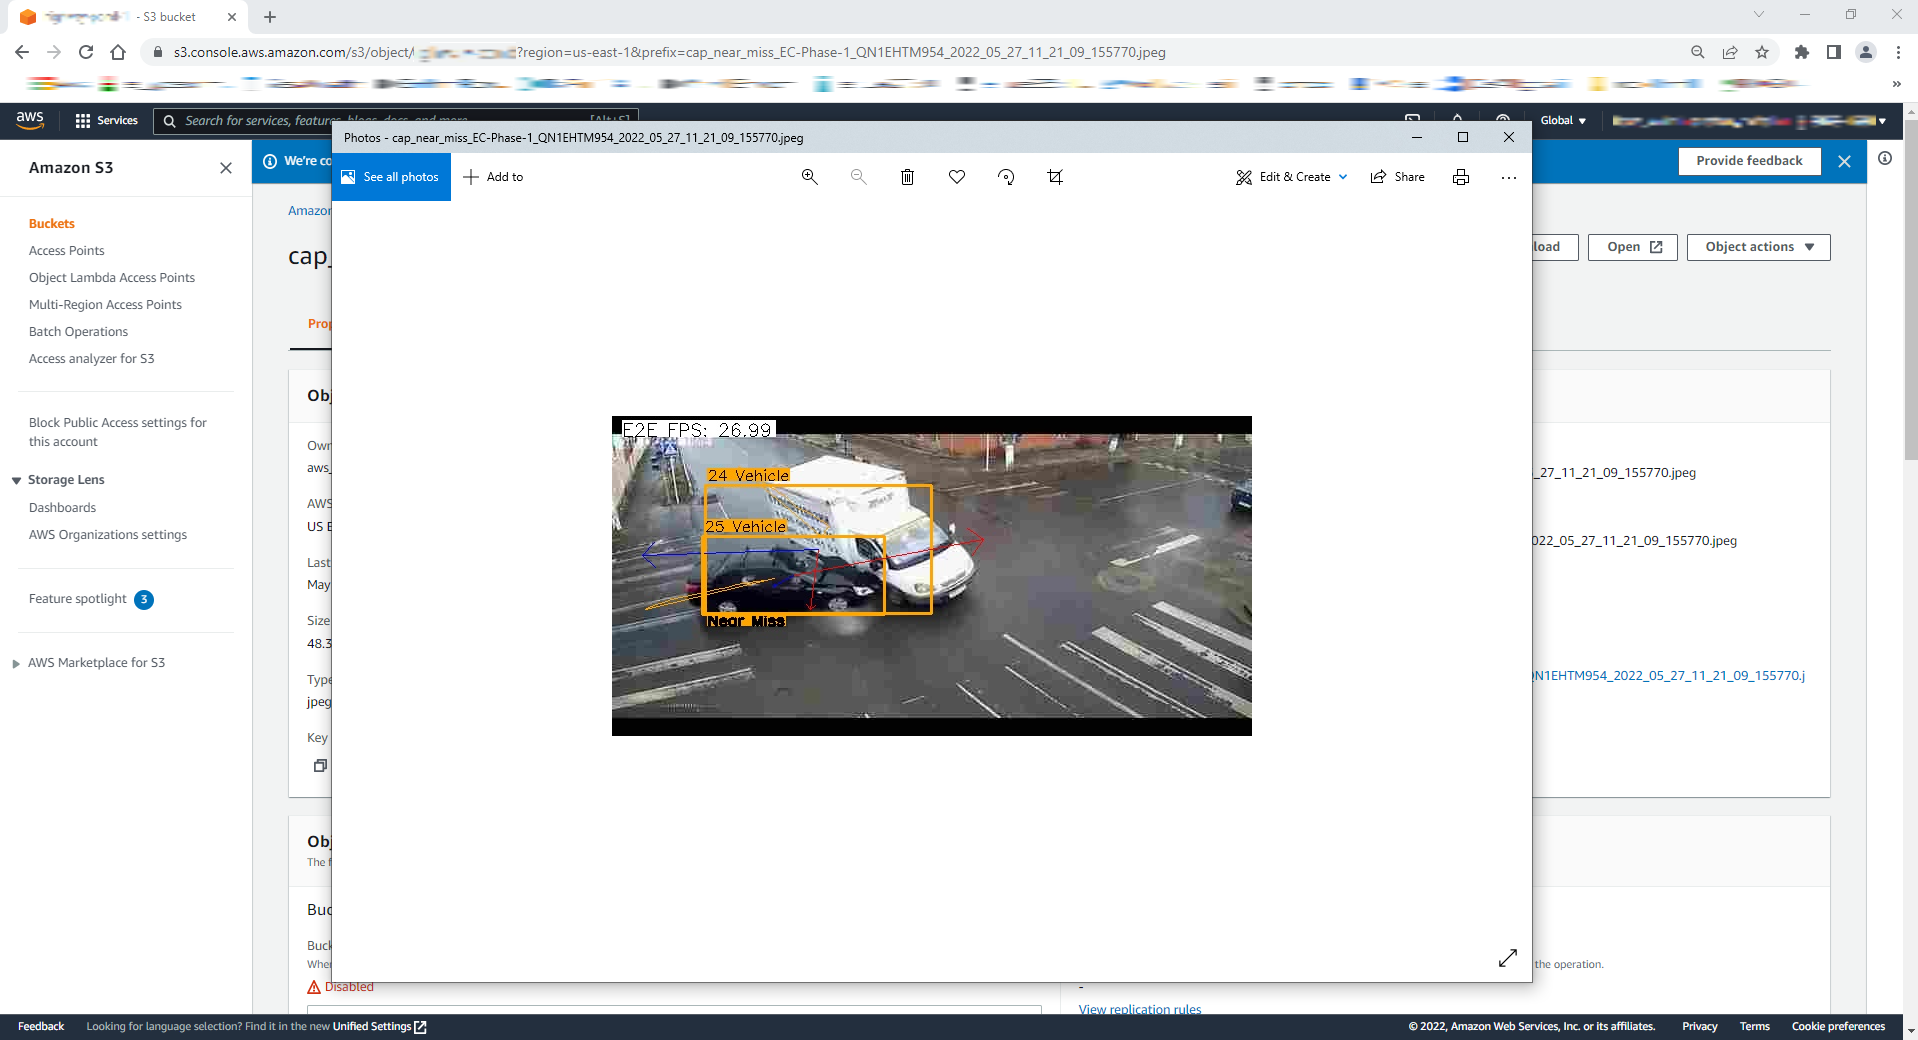
Figure 18: AWS S3 Bucket Object Photo
Step 4: Uninstall the Application
-
Check installed modules with the following command:
cd /home/smartedge-open/wireless_network_ready_intelligent_traffic_management

./edgesoftware list
All installed modules will show as seen in the screen below:
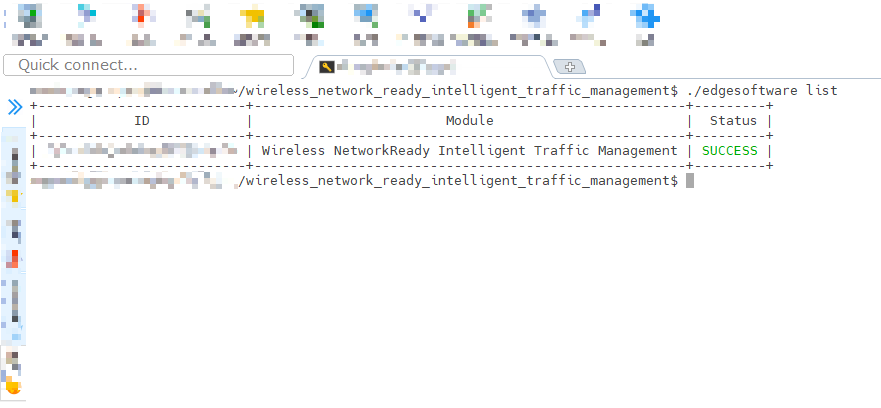
Figure 19: Installed modules list
-
Run the command below to uninstall all the modules:
./edgesoftware uninstall –a -
Run the command below to uninstall the Wireless Network Ready ITM reference implementation:
./edgesoftware uninstall <itm-id get from step 1>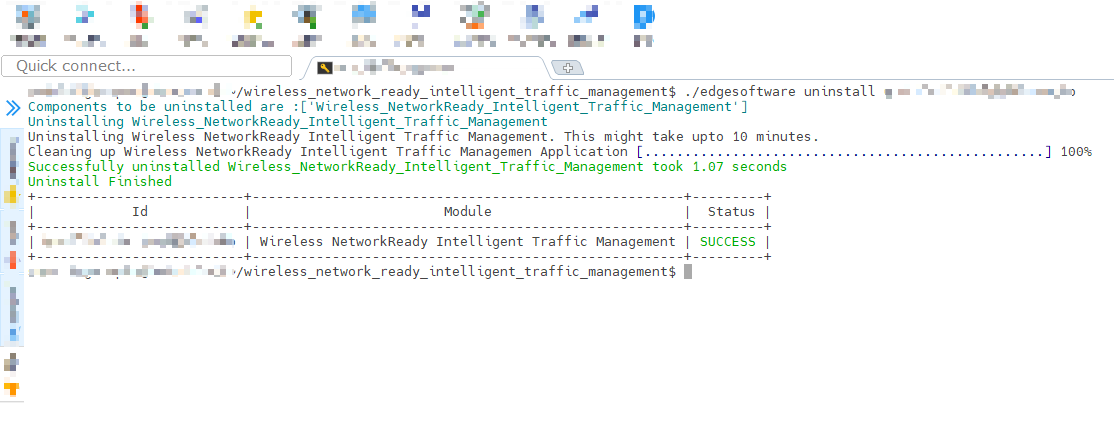
Figure 20: Uninstalled Modules
Node Feature Discovery (NFD)
Wireless Network-Ready Intelligent Traffic Management uses Intel® Distribution of OpenVINO™ toolkit which is optimized for Intel® processors that support special instructions like AVX512VNNI for optimized performance. The deployment of this application will require the node with this feature supported on the node along with Ubuntu 20.04 OS. This NFD feature ensures to deploy the application on the node supported with these features. NFD is installed by Intel® Smart Edge Open Developer Experience Kit and running as two pods on Intel® Smart Edge Open.
$ kubectl get pods -A | grep smartedge-system
smartedge-system      nfd-release-node-feature-discovery-master-7b94765ccf-9ghjg   1/1    Running   5 (6d18h ago)    7d23h
smartedge-system      nfd-release-node-feature-discovery-worker-dq4x6              1/1    Running   5 (6d18h ago)    7d23h
Wireless Network-Ready Intelligent Traffic Management pods scheduled and running successfully on Intel® Smart Edge Open node based on hardware capabilities of Intel® Xeon® Scalable server.
$ kubectl get pods -A | grep smartedge-apps
smartedge-apps           influxdb-57fc78dd78-jwrgl             1/1     Running   0             4d21h
smartedge-apps           wnr-itm-7bd85c485c-mxscf              1/1     Running   0             4d21h
Public Helm Registry for Helm Charts
Installation of Wireless Network-Ready Intelligent Traffic Management Reference Implementation on Intel® Smart Edge Open is accomplished using Helm charts. Earlier Helm charts used to be a part of Reference Implementation installation package. Now a global Helm repo is issued so that Reference Implementation Helm charts can be accessible from private and public network. This will speed up and ease the process of introducing updates and their integration with Reference Implementation.
Local Build Instructions
After you have installed Intel® Smart Edge Open Developer Experience Kit from Prerequisites, you can build your own Wireless-Network Ready Intelligent Traffic Management Docker image using the following instructions.
You can proceed with the steps presented using either edgesoftware sources or GitHub sources: WNR-ITM Repository
Setup
Change the directory to repository path with one of the following options.
For Edgesoftware:
cd /home/smartedge-open/wireless_network_ready_intelligent_traffic_management/Wireless_NetworkReady_Intelligent_Traffic_Management_22.1/Wireless_NetworkReady_Intelligent_Traffic_Management
For GitHub:
git clone
cd wireless_network_ready_intelligent_traffic_management/
git checkout --track origin/2022.1
Use your preferred text editor to make the following file updates.
In the next steps, the tag <REPOSITORY_PATH> indicates the path to the repository.
In the Change examples, replace the line indicated by - with the line indicated by +
-
/src/build_images.sh - update the tag and version for the image.
Change example: - TAG="5.0" + TAG="5.1" -
/helm/services/values.yaml - update image deployment harbor.
Change example: - images: - registry: "" + images: + registry: <local harbor host>:<local_harbor_port>/<repository>/ -
/helm/services/values.yaml - update version.
Change example:
- images:
-   tag: "5.0"
+ images:
+   tag: "5.1"
Build and Install
Build the Docker image with the following commands:
cd <REPOSITORY_PATH>/src/
./build_images.sh  -c CONTROLLER_IP # The local Docker image will be built on the Ubuntu machine.
Install Helm with the following commands:
-
Get Grafana password:
kubectl get secrets/grafana -n telemetry -o json | jq -r '.data."admin-password"' | base64 -d -
Get the Grafana service IP using the following command:
kubectl describe service -n telemetry grafana |grep -i Endpoint -
Get the host IP using the following command:
hostname -I | awk '{print $1}' -
Change directory to deployment directory from repository path:
cd <REPOSITORY_PATH>/helm/ -
Deploy the MQTT broker and wait for it to initialize:
helm install broker broker/ --set namespace=smartedge-apps kubectl wait --namespace=smartedge-apps --for=condition=Ready pods --timeout=600s --selector=app=hivemq-cluster1 -
Using the host IP, Grafana service IP and password from steps 1 and 2, run the following Helm installation command:
helm install wnr-itm services/ --wait --timeout 10m \
         --set grafana.password=<Grafana_Password> \
         --set grafana.ip=<Grafana_PodIP> \
         --set host_ip=<Controller_IP> \
         --set namespace=smartedge-apps \
         --set proxy.http=<HTTP_PROXY> \
         --set proxy.https=<HTTPS_PROXY> \
         --set cloud_connector.aws_key=<AWS_KEY_ID> \
         --set cloud_connector.aws_secret=<AWS_SECRET> \
         --set cloud_connector.aws_bucket=<AWS_BUCKET>
NOTES:
If your host is not behind a firewall, then skip setting the http and https proxy.
Cloud connector requires your AWS credentials to connect to it to upload video captures in case of collision, near miss and overcrowd events. If you don't want this feature enabled, then skip setting these parameters. For instructions on how to configure AWS, refer to the Set Up Amazon Web Services* Cloud Storage section.
If the command above fails with an error related to PostgreSQL dependencies, execute the following command:
helm dependency build services/
After step 6 completes, use your preferred browser to access WNR ITM at: https://Controller_IP:30300 and Grafana https://Controller_IP:32000
Optional Steps
Configure the Input
The Helm templates contains all the necessary configurations for the cameras.
If you wish to change the input, edit the ./helm/services/values.yaml file and add the video inputs to the test_videos array:
itm_video_inference:
  name: "itm-video-inference"
  topic:
    publisher: "camera"
  test_videos:
    - uri: "file:///app/test_videos/video_car_crash.avi"
    - uri: "file:///app/test_videos/video_pedestrians.avi"
To use camera stream instead of video, replace the video file name with /dev/video0.
To use RTSP stream instead of video, replace the video file name with the RTSP link.
Each ITM Video Inference service will pick a video input in the order above.
If you wish to change the coordinates, address and the analytics type of the cameras, edit the ./helm/services/templates/itm-analytics-configmap.yaml file:
-
address: Name of the camera’s geographic location. Must be a non-empty alpha numeric string.
-
latitude: Latitude of the camera’s geographic location.
-
longitude: Longitude of the camera’s geographic location.
-
analytics: Attribute to be detected by the model.
NOTE: The default model supports pedestrian, vehicle and bike detection. You can select desired attributes from these. (E.g.: "analytics": "pedestrian vehicle detection")
Stop the Application
To remove the deployment of this reference implementation, run the following commands.
NOTE: The following commands will remove all the running pods and the data and configuration stored in the device, except the MQTT Broker.
helm delete wnr-itm
If you wish to remove the MQTT Broker too, enter the command:
helm delete broker
Set Up Amazon Web Services Cloud* Storage
To enable Cloud Storage on the installed Reference Implementation, you will need Amazon Web Services* (AWS*) paid/free subscription to enable your root user account that has to support the following services:
- Identity and Access Management (IAM)
- Amazon S3 Bucket
After finishing the setup for IAM and S3, you will have your AWS_KEY_ID, AWS_SECRET_KEY and AWS_BUCKET_NAME to be used on your Wireless Network Ready Intelligent Traffic Management Cloud Connector - Configuration.
References
Setup Steps
-
From your AWS management console, search for IAM and open the IAM Dashboard.
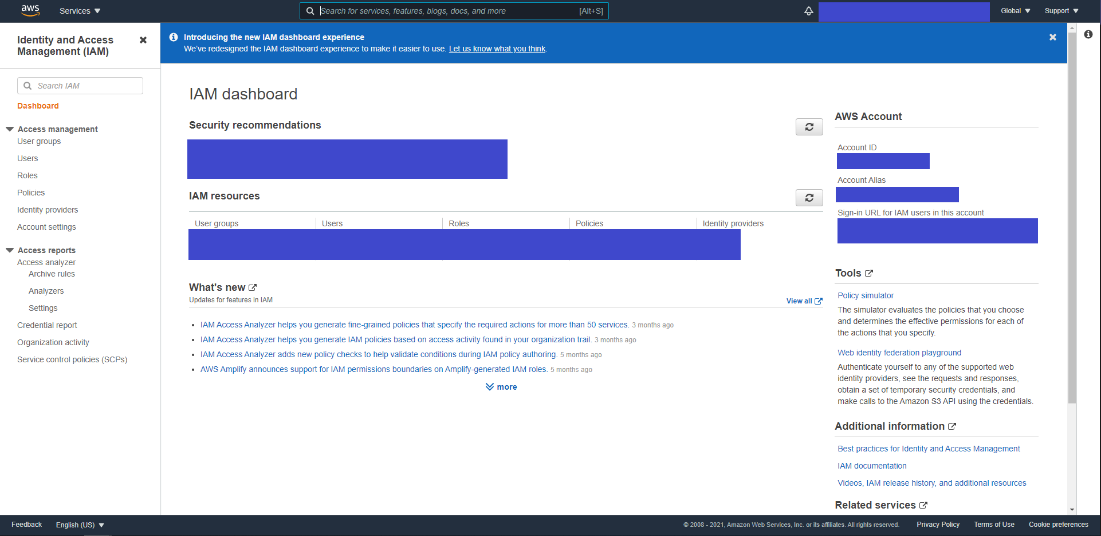
Figure 21: IAM Dashboard
-
On the left menu of the dashboard, go to Access management and click on Users to open the IAM Users tab.
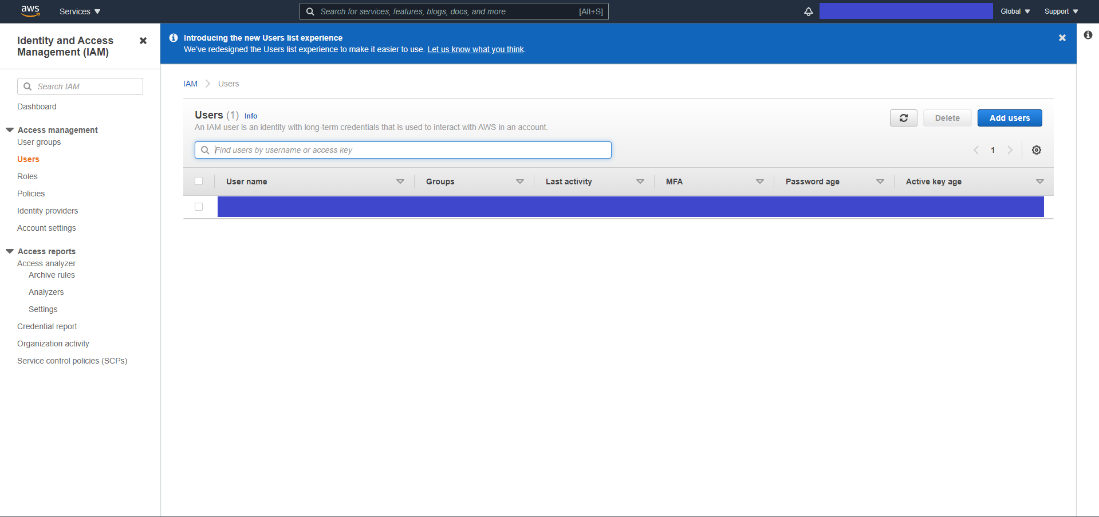
Figure 22: IAM Users Tab
-
From the IAM users tab, click on Add User to access the AWS add user setup.
-
On the first tab, provide the username and select the AWS credentials type to be Access key.
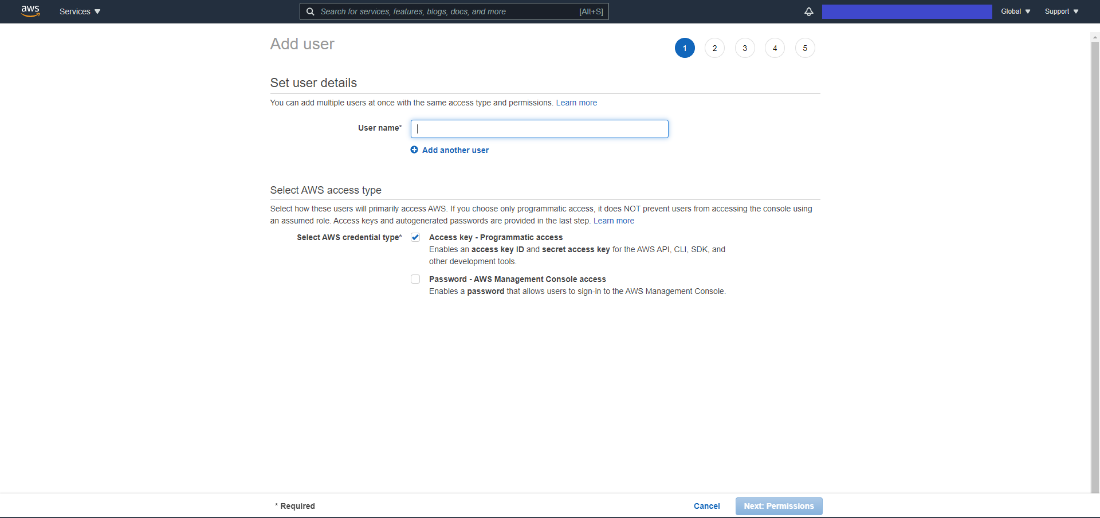
Figure 23: Set User Details Tab
-
On the second tab, create a group to attach policies for the new IAM user.
a. Search for S3 and select AmazonS3FullAccess policy.
b. Click on Create group.
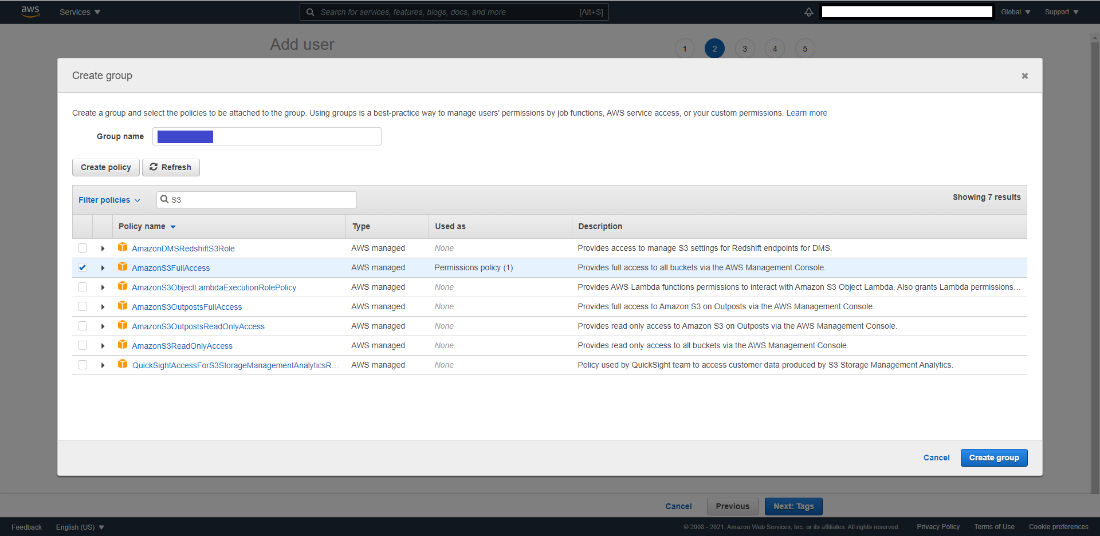
Figure 24: Create Group Tab
-
Select the group you have created and click on Next: Tags.
-
Tags are optional. If you don't want to add tags, you can continue to the Review tab by clicking on Next: Review.
-
After review, you can click on the Create User button.
-
On this page, you have access to AWS Key and AWS Secret Access key. (Click on Show to view them.)
a. Save both of them to be used later on your Cloud Data - Configuration on the Edge Insights for Fleet Reference Implementation you have installed.
NOTE: The AWS Secret Key is visible only on this page, you cannot get the key in any other way.
b. If you forget to save the AWS Secret Key, you can delete the old one and create another key.
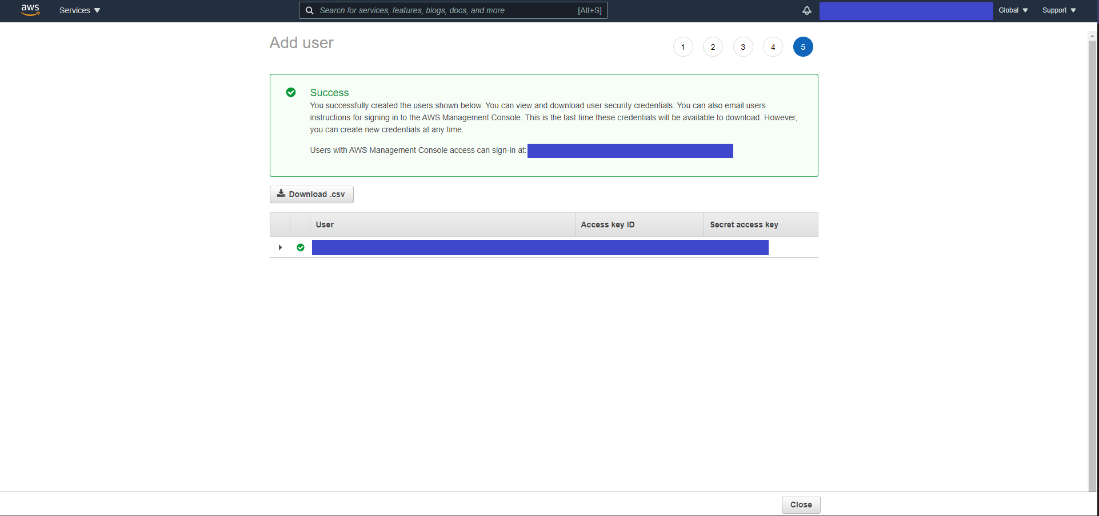
Figure 25: AWS Key and Secret Access Key
-
After you have saved the keys, close the tab. You are returned to the IAM Dashboard page.
-
Click on the user created and save the User ARN to be used on S3 bucket setup.
NOTE: If you forget to save the AWS Secret key from the User tab, you can select Security Credentials, delete the Access Key and create another one.
S3 Bucket
S3 bucket service offers cloud storage to be used on cloud based applications.
S3 Bucket Service setup
-
Open the Amazon Management Console and search for Amazon S3.
-
Click on S3 to open the AWS S3 Bucket dashboard.

Figure 26: AWS S3 Bucket Dashboard
-
On the left side menu, click on Buckets.
-
Click on the Create Bucket button to open the Create Bucket dashboard.
-
Enter a name for your bucket and select your preferred region.
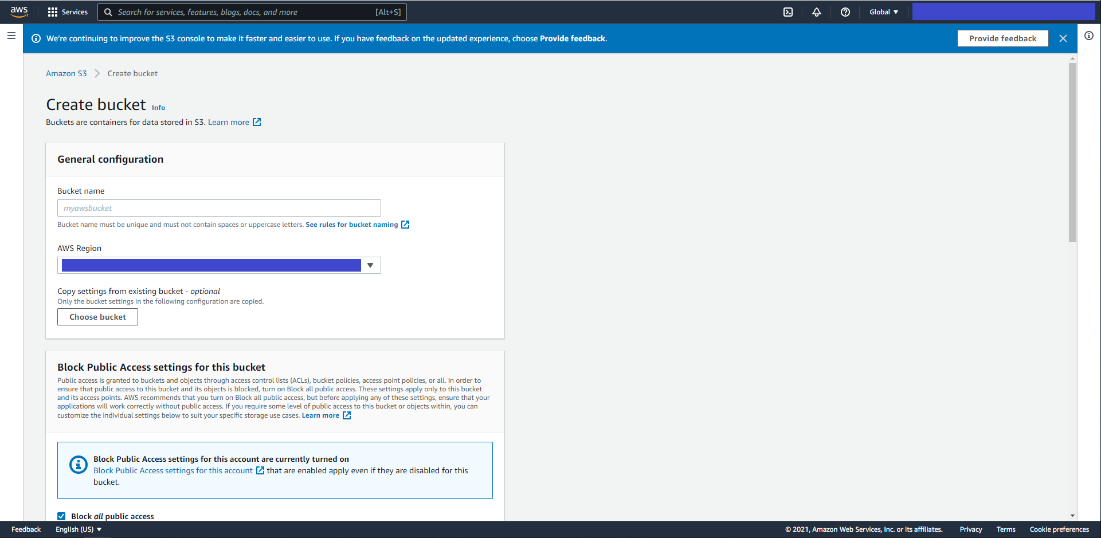
Figure 27: Create Bucket General Configuration
-
Scroll down and click on Create Bucket.
-
From the S3 Bucket Dashboard, click on the newly created bucket and go to the Permissions tab.
-
Scroll to Bucket Policy and click on Edit to add a new statement in statements tab that is already created to deny all the uploads.
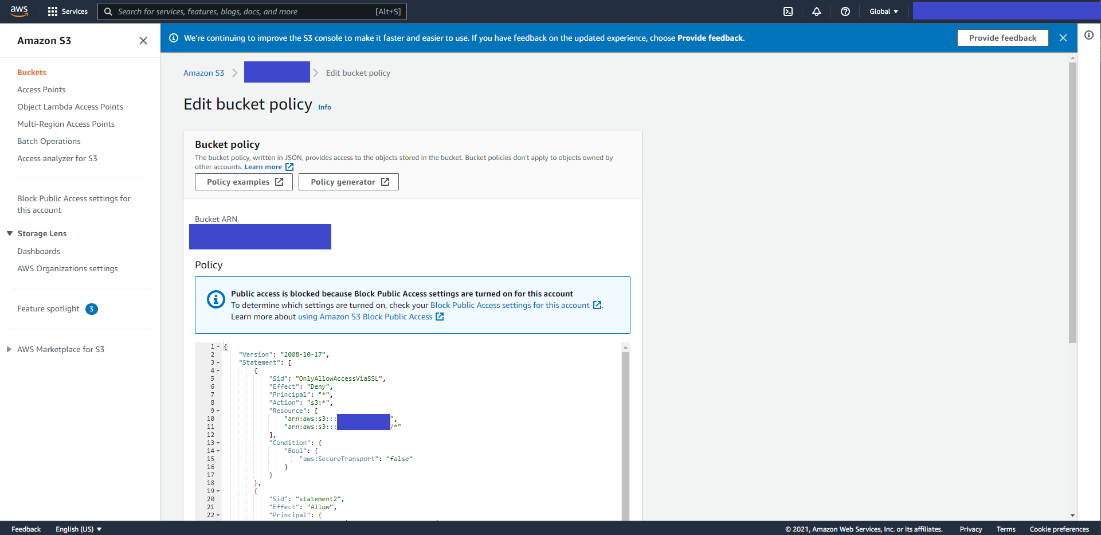
Figure 28: Edit Bucket Policy
-
You must add a comma before adding the following information.
{
  "Sid": "<Statement name>",
  "Effect": "Allow",
  "Principal": {
      "AWS": "<User_ARN_Saved>"
  },
  "Action": "s3:*",
  "Resource": [
      "arn:aws:s3:::<bucket_name>",
      "arn:aws:s3:::<bucket_name>/*"
  ]
}
a. Update with the following statement with statement name, your user ARN saved at IAM setup - step 11 and your bucket name.
b. Click on Save changes. If the change is successful, you will see a success saved message, otherwise you need to re-analyze the json file to fix the error.
Summary and Next Steps
This application successfully implements Intel® Distribution of OpenVINO™ toolkit plugins for detecting and tracking vehicles and pedestrians and may be used for a basis in estimating a safety metric for an intersection. It can be extended further to provide support for a feed from a network stream (RTSP or camera device).
As a next step, you can experiment with accuracy/throughput trade-offs by substituting object detector models and tracking and collision detection algorithms with alternative ones.
In addition, on an appropriate platform with supporting RAN hardware you can onboard a 3rd party 5G RAN (Radio Access Network) implementation that will make it easy to host a private or public 5G small cell. To perform video analytics wireless IP cameras can be connected through the small cell, and the video traffic from the cameras can be routed via the high-speed SmartEdge-Open data plane to the visual intelligence container. With the 5G RAN and visual intelligence workloads hosted in a single system, the solution benefits from faster data transfers between the workloads and a reduced total cost of ownership.
Learn More
To continue your learning, see the following guides and software resources:
Troubleshooting
Pods status check
Verify that the pods are Ready as well as in Running state using the below command:
kubectl get pods -n smartedge-apps
If any pods are not in Running state, use the following command to get more information about the pod state:
kubectl describe -n smartedge-apps pod <pod_name>
ITM Dashboard Not Showing on Browser After Restart Server
Run the following commands:
# Get Grafana pod ip
kubectl get pod -n telemetry -owide |grep grafana*
grafana-8465558bc8-5p65x            3/3     Running   24 (5h23m ago)   12d   10.245.179.203

#update ITM yaml file
kubectl set env deployment/wnr-itm -n smartedge-apps GRAFANA_HOST=10.245.179.203
Pod status shows “ContainerCreating” for long time
If Pod status shows “ContainerCreating” or “Error” or “CrashLoopBackOff” for a while (5 minutes or more), run the following commands:
reboot
su
swapoff -a
systemctl restart kubelet  # Wait till all pods are in “Running” state.
./edgesoftware install
Subprocess:32 issue
If you see any error related to subprocess, run the command below:
pip install --ignore-installed subprocess32==3.5.4
Grafana Dashboard Not Showing on Browser
Run the following commands:
helm delete wnr-itm

# Get the ip for Grafana service
kubectl describe service -n telemetry grafana |grep -i Endpoint`

# Get the Grafana Password
kubectl get secrets/grafana -n telemetry -o json | jq -r '.data."admin-password"' | base64 -d

helm install wnr-itm ./wireless-ready-itm --set itm.hostIp=<Controller_IP> --set itm.grafanaHost=<Grafana_PodIP>
--set itm.grafanaPassword=<Garafana_Password>"
Support Forum
If you're unable to resolve your issues, contact the Support Forum.
To attach the installation logs with your issue, execute the command below to consolidate a list of the log files in tar.gz compressed format, e.g., ITM.tar.gz.
tar -czvf ITM.tar.gz /var/log/esb-cli/Wireless_NetworkReady_Intelligent_Traffic_Management_<version>/Component_name/install.log