Visible to Intel only — GUID: klc1638580197736
Ixiasoft
1. About this Document
2. Introduction
3. Nios® V Processor Hardware System Design with Intel® Quartus® Prime Pro Edition and Platform Designer
4. Nios® V Processor Software System Design
5. Nios® V Processor Configuration and Booting Solutions
6. Nios® V Processor - Using the MicroC/TCP-IP Stack
7. Nios® V Processor Debugging, Verifying, and Simulating
8. Document Revision History for the Nios® V Embedded Processor Design Handbook
5.1. Introduction
5.2. Linking Applications
5.3. Nios® V Processor Booting Methods
5.4. Introduction to Nios® V Processor Booting Methods
5.5. Nios® V Processor Booting from Configuration QSPI Flash
5.6. Nios V Processor Booting from On-Chip Memory (OCRAM)
5.7. Summary of Nios V Processor Vector Configuration and BSP Settings
5.5.2.1.1. Hardware Design Flow
5.5.2.1.2. Software Design Flow
5.5.2.1.3. Software Design Flow (SDM Bootloader Project)
Creating the SDM Bootloader BSP Project
Configuring BSP Editor and Generating the BSP Project
Create the SDM Bootloader Application Project
Building the SDM Bootloader Project
Generating the HEX File and Initializing the Memory
5.5.2.1.4. Software Design Flow (User Application Project)
5.5.2.1.5. Programming Files Generation
5.5.2.1.6. QSPI Flash Programming SDM
7.4.1. Prerequisites
7.4.2. Setting Up and Generating Your Simulation Environment in Platform Designer
7.4.3. Creating Nios V Processor Software
7.4.4. Generating Memory Initialization File
7.4.5. Generating System Simulation Files
7.4.6. Running Simulation in the QuestaSim Simulator Using Command Line
Visible to Intel only — GUID: klc1638580197736
Ixiasoft
5.5.2.1.3. Software Design Flow (SDM Bootloader Project)
This section provides the design flow to generate and build the SDM Bootloader project.
Creating the SDM Bootloader BSP Project
To launch the BSP Editor, follow these steps:
- In the Platform Designer window, select File > New BSP. The Create New BSP windows appears.
- For BSP setting file, navigate to the software/mailbox_bootloader/bsp folder and name the BSP as settings.bsp.
BSP path: <project directory>/software/mailbox_bootloader/bsp/settings.bsp
- For System file (qsys or sopcinfo), select the Nios V/m processor Platform Designer system (.qsys) file.
- For Quartus project, select the Quartus Project File.
- For Revision, select the correct revision.
- For CPU name, select the Nios V/m processor.
- Select the Operating system as Altera HAL.
- Click Create to create the BSP file.
Figure 52. Create New BSP Window
Configuring BSP Editor and Generating the BSP Project
- Go to BSP Editor > Main > Settings
- Configure the settings per the following figures:
Figure 53. hal SettingsFigure 54. hal.linker SettingsFigure 55. hal.make Settings
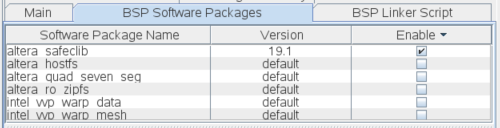
- Go to BSP Software Package and enable altera_safeclib
Figure 56. BSP Software Package
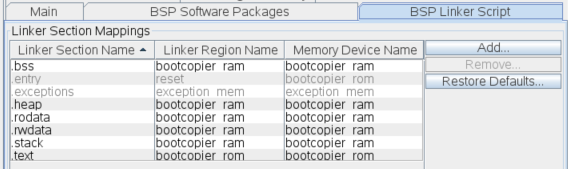
- Click the BSP Linker Script tab in the BSP Editor.
- Set the .text item in the Linker Section Name to the Bootloader ROM in the Linker Region Name. Set the rest of the items in the Linker Section Name list to the Bootloader RAM.
Figure 57. Linker Region Settings
- Navigate to the BSP Driver tab and disable all drivers (except the Nios V Processor and Mailbox Client Intel FPGA IP).
Figure 58. BSP Driver tab

- Click Generate BSP. Make sure the BSP generation is successful.
- Close the BSP Editor.
Create the SDM Bootloader Application Project
- Generate the example design files (Refer to SDM Bootloader Example Design). You do not need to build the example design.
- Navigate to the software/mailbox_bootloader/app folder in the SDM Bootloader Example Design project.
- Copy the SDM bootloader (mailbox_bootloader.c) into the software/mailbox_bootloader/app folder in your project.
- Redefine the PAYLOAD_OFFSET in mailbox_bootloader.c.
Note: The SOF image size influences the PAYLOAD_OFFSET. The PAYLOAD_OFFSET is the start address of the Nios® V application HEX file in QSPI flash and must point to a location after the SOF image. You can determine the minimum PAYLOAD_OFFSET by using the configuration bitstream size from the device datasheet.
For example, the estimated compressed configuration bitstream size for Intel Stratix 10 SX 2800 is 577 Mbits (72.125 MBytes). The actual size can be equal or smaller than this bitstream size. If the SOF image starts at address 0x0, the SOF image should reached until address 0x44C8FFF (0x44C8A48). With that, the minimum PAYLOAD_OFFSET you can select is 0x4500000.
- Launch the Nios V Command Shell.
- Execute the command below to generate the SDM bootloader application CMakeLists.txt.
niosv-app --app-dir=software/mailbox_bootloader/app\
        --bsp-dir=software/mailbox_bootloader/bsp\
        --srcs=software/mailbox_bootloader/app/mailbox_bootloader.c
Building the SDM Bootloader Project
You can choose to build the SDM bootloader project using Eclipse Embedded CDT, or through the command line interface (CLI).
For more information about Eclipse Embedded CDT, refer to Related Information.
With the CLI , you can build the SDM bootloader using the following steps:
- Setup the PATH variables, refer to Setting Up Open-Source Tools.
- Execute the command below to build the SDM bootloader.
cmake -G "Unix Makefiles" -DCMAKE_BUILD_TYPE=Release -B \
        software/mailbox_bootloader/app/release -S \
        software/mailbox_bootloader/app
make -C software/mailbox_bootloader/app/releaseThe SDM bootloader (.elf) file is created in software/mailbox_bootloader/app/release folder.
Generating the HEX File and Initializing the Memory
A HEX file must be generated from the ELF file so that the HEX file can be used for memory initialization.
- Launch the Nios V Command Shell.
- For SDM bootloader, use the following command line to convert the ELF to HEX. This command creates the SDM bootloader (bootcopier_rom.hex) file.
elf2hex software/mailbox_bootloader/app/release/app.elf \
  -o bootcopier_rom.hex -b <base address of Bootloader ROM> \
  -w <data width of Bootloader ROM> -e <end address of Bootloader ROM> -r 4
Recompile the hardware design to memory-initialize the bootcopier_rom.hex into the Bootloader ROM.